Video Editor - Edit videos fast with one-click actions and live effects, then layer everything on a full multi-track timeline with keyframe animation and audio mixing (Updated Nov 2026)
Description
The Video Editor is a full multi-track video editor in the style of CapCut: import your videos, photos and music, lay them out on a timeline, add titles, stickers, transitions, filters and effects from a tabbed library, and export one finished video — using hardware encoding (NVIDIA, Intel or AMD) when your PC has it, so exports are fast.
Stack video, image, audio, text and effect tracks; drag and trim clips with snapping; animate titles and photos with keyframes; blur or pixelate a face or number plate and have the blur follow it as it moves; switch the whole project to a portrait or square shape for social; mix the audio so music ducks under your voice; and watch it play back before you export. For one-off jobs on a single clip — trim, convert, make a GIF, remove silences, hit a target file size, add captions, green screen or picture-in-picture — open
Tools ▸ Quick video tools. Everything runs on the video engine that ships with the app, so there is nothing to install.
Before you start — requirements
Nothing extra is needed. Editing, effects, playback and export all use the video engine that ships inside FW Admin Tech Tools Pro — there is nothing to download or set up.
Run as administrator. As with the rest of the suite, run the app as administrator so it can read and write your files cleanly.
Offline captions (optional). The
Captions feature transcribes speech to subtitles entirely on your PC. To use it, point the tool at a free offline speech model in
Settings (a whisper.cpp executable and a model file); everything else works without it.
Where your settings and projects live. Exports are saved to the output folder you choose (a
FW Video Edits folder in your
Videos by default). Your preferences are stored under
%LOCALAPPDATA%\FWAdminTechToolsPro\TechTools, tied to the product rather than the version, so they're kept when you update the app.
The main window
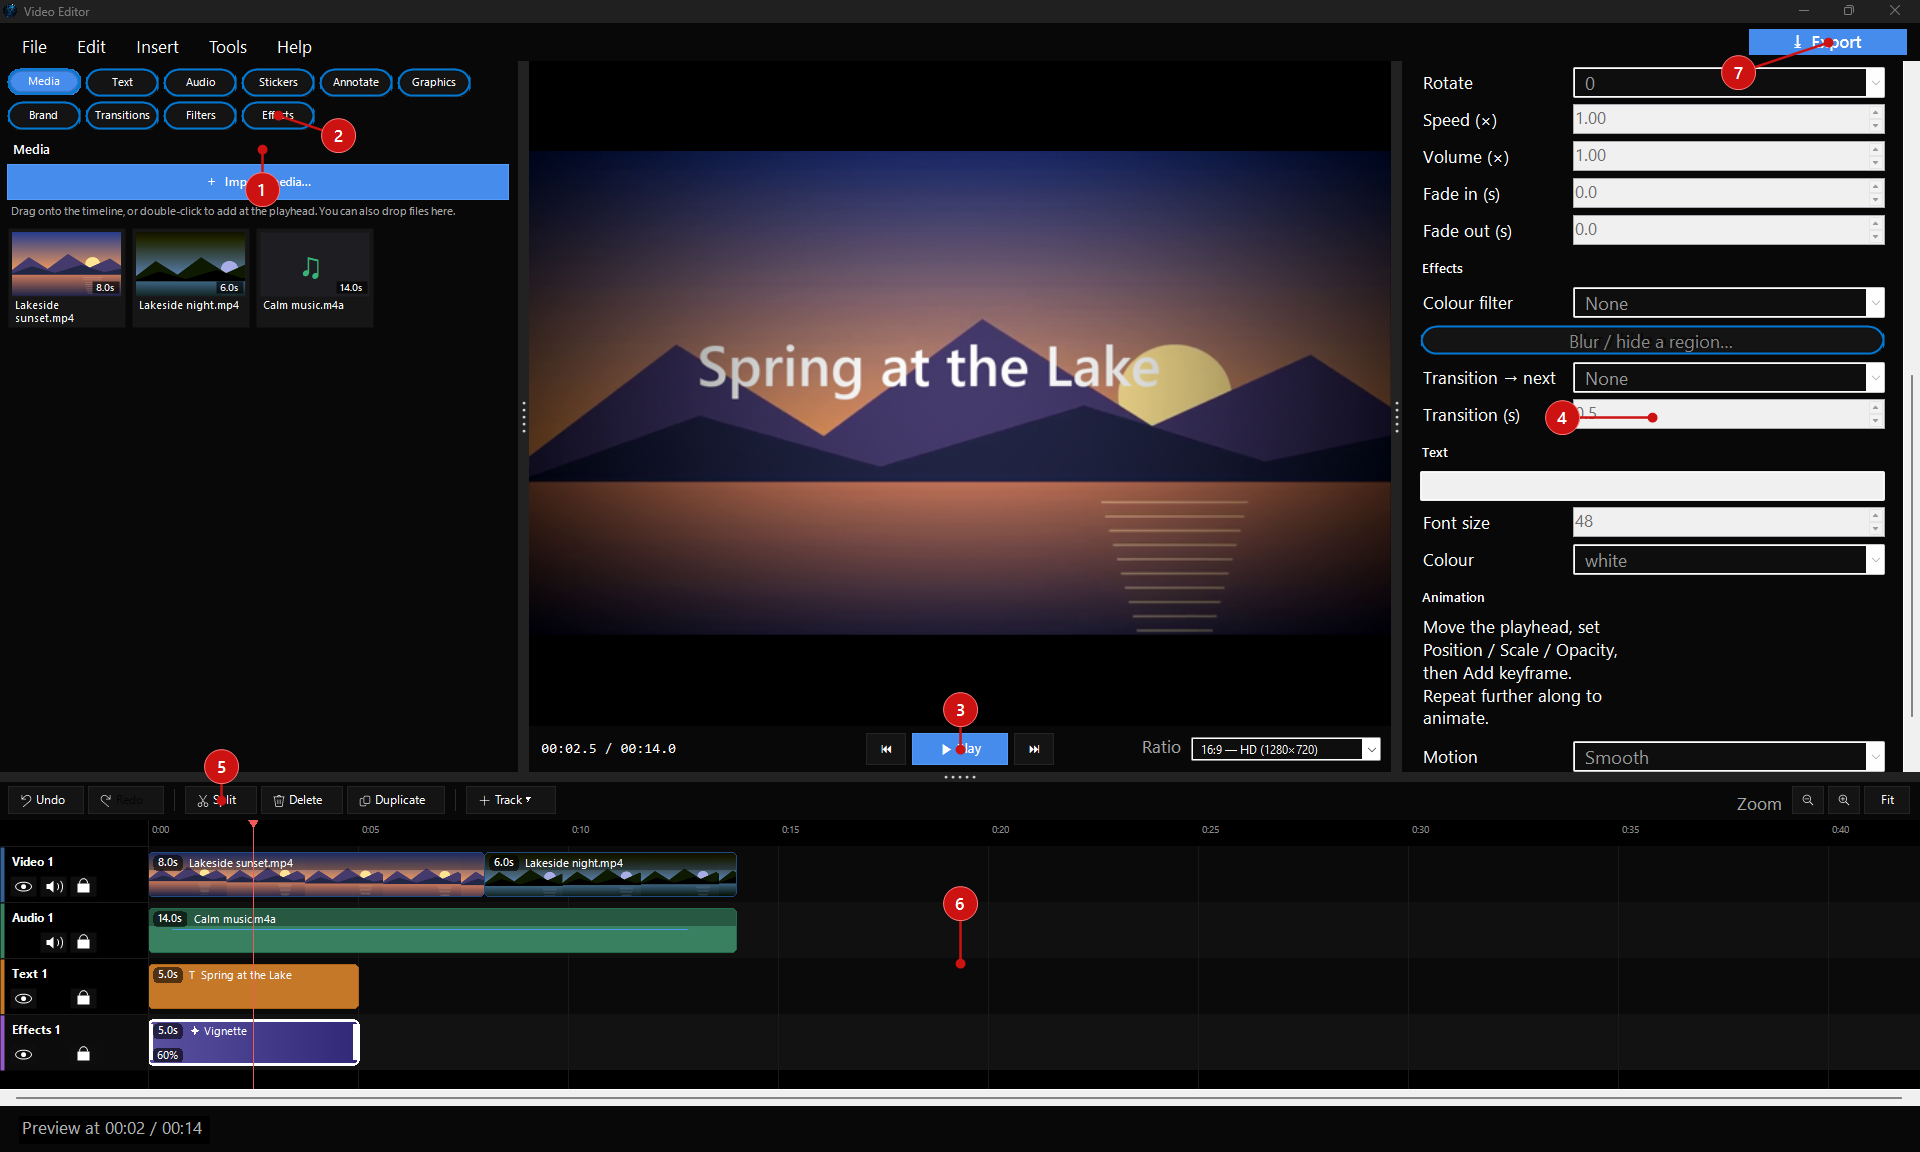 1. Import media.
Click
Import media... (or File ▸ Import media, Ctrl+I), or drop files onto the window. They appear in the media bin; drag one onto the timeline, or double-click it to add it at the playhead.
2. The library. The tabs along the top left — Media, Text, Audio, Stickers, Annotate, Graphics, Brand, Transitions, Filters and Effects — hold everything you can add. Click or drag an item onto the timeline; filters and effects become bars on an Effects track that change everything underneath them for as long as the bar lasts.
3. The player. The preview shows the frame at the playhead. Press Play to watch the edit, use the arrows to jump to the start or end, and pick the picture shape (16:9, 9:16, square and more) in
Ratio.
4. Properties. Select a clip and its settings appear on the right: start, length, position, scale, opacity, rotation, speed, volume, fades, colour filter, transition, text style and keyframe animation.
5. Edit tools. Undo / Redo, Split at the playhead (Ctrl+B), Delete, Duplicate, add a track, and Zoom / Fit to see the whole timeline.
6. The timeline. Video, audio, text and effect tracks stack from top to bottom. Drag clips to move them, drag their ends to trim, and use each track's eye, speaker and lock buttons to hide, mute or protect it.
7. Export. Renders the finished video to MP4 (or your chosen format) in the background.
Change the voice in a clip (Tools ▸ Change the voice in the selected clip)
1. Click a video or audio clip on the timeline.
2. Open
Tools ▸ Change the voice in the selected clip....
3. Pick a voice - a disguise such as
Anonymous - deeper, a fun voice such as
Robot, or
My voice if you made one in the
Voice Changer - and click
Change the voice.
A copy of the clip's file is made next to it, named like
Narration (changed voice).wav, and the clip uses it from then on. The original file isn't changed, the clip keeps its length, and
Undo puts the original back. To fine-tune a voice first, use the Voice Changer tool.
Quick video tools (Tools ▸ Quick video tools)
One-clip jobs live in their own window. Open a video there and each job is a click away; it renders in the background and never changes your original.
- Trim: Keep just the part you want between a start and end time.
- Convert: Change the format — MP4, WebM or MKV.
- Resize: Set a new width; the height keeps the aspect ratio.
- Speed: Speed a clip up or slow it down (0.25× to 4×), audio kept in time.
- Rotate / flip: Turn a sideways phone clip the right way up, or mirror it.
- Extract audio: Pull the sound out to MP3, AAC/M4A or WAV.
- Snapshot: Save the current frame as a PNG.
- GIF: Turn a short section into an animated GIF.
- Remove silences: Listen for the quiet gaps and cut them out automatically, leaving a tighter clip.
- Target size: Aim for a file size in megabytes (for an upload limit) and it works out the bitrate for you.
- Batch: Convert an entire folder of videos to your default format in one go.
Fast exports. When your graphics card or CPU has a built-in H.264 encoder (NVIDIA NVENC, Intel Quick Sync or AMD AMF), the tool uses it automatically for much quicker renders; otherwise it falls back to a high-quality software encoder.
Live effects — see it before you commit
In Quick video tools, pick an effect from the dropdown and it previews on the video straight away; press Play to watch it in motion, then
Export effect to render it.
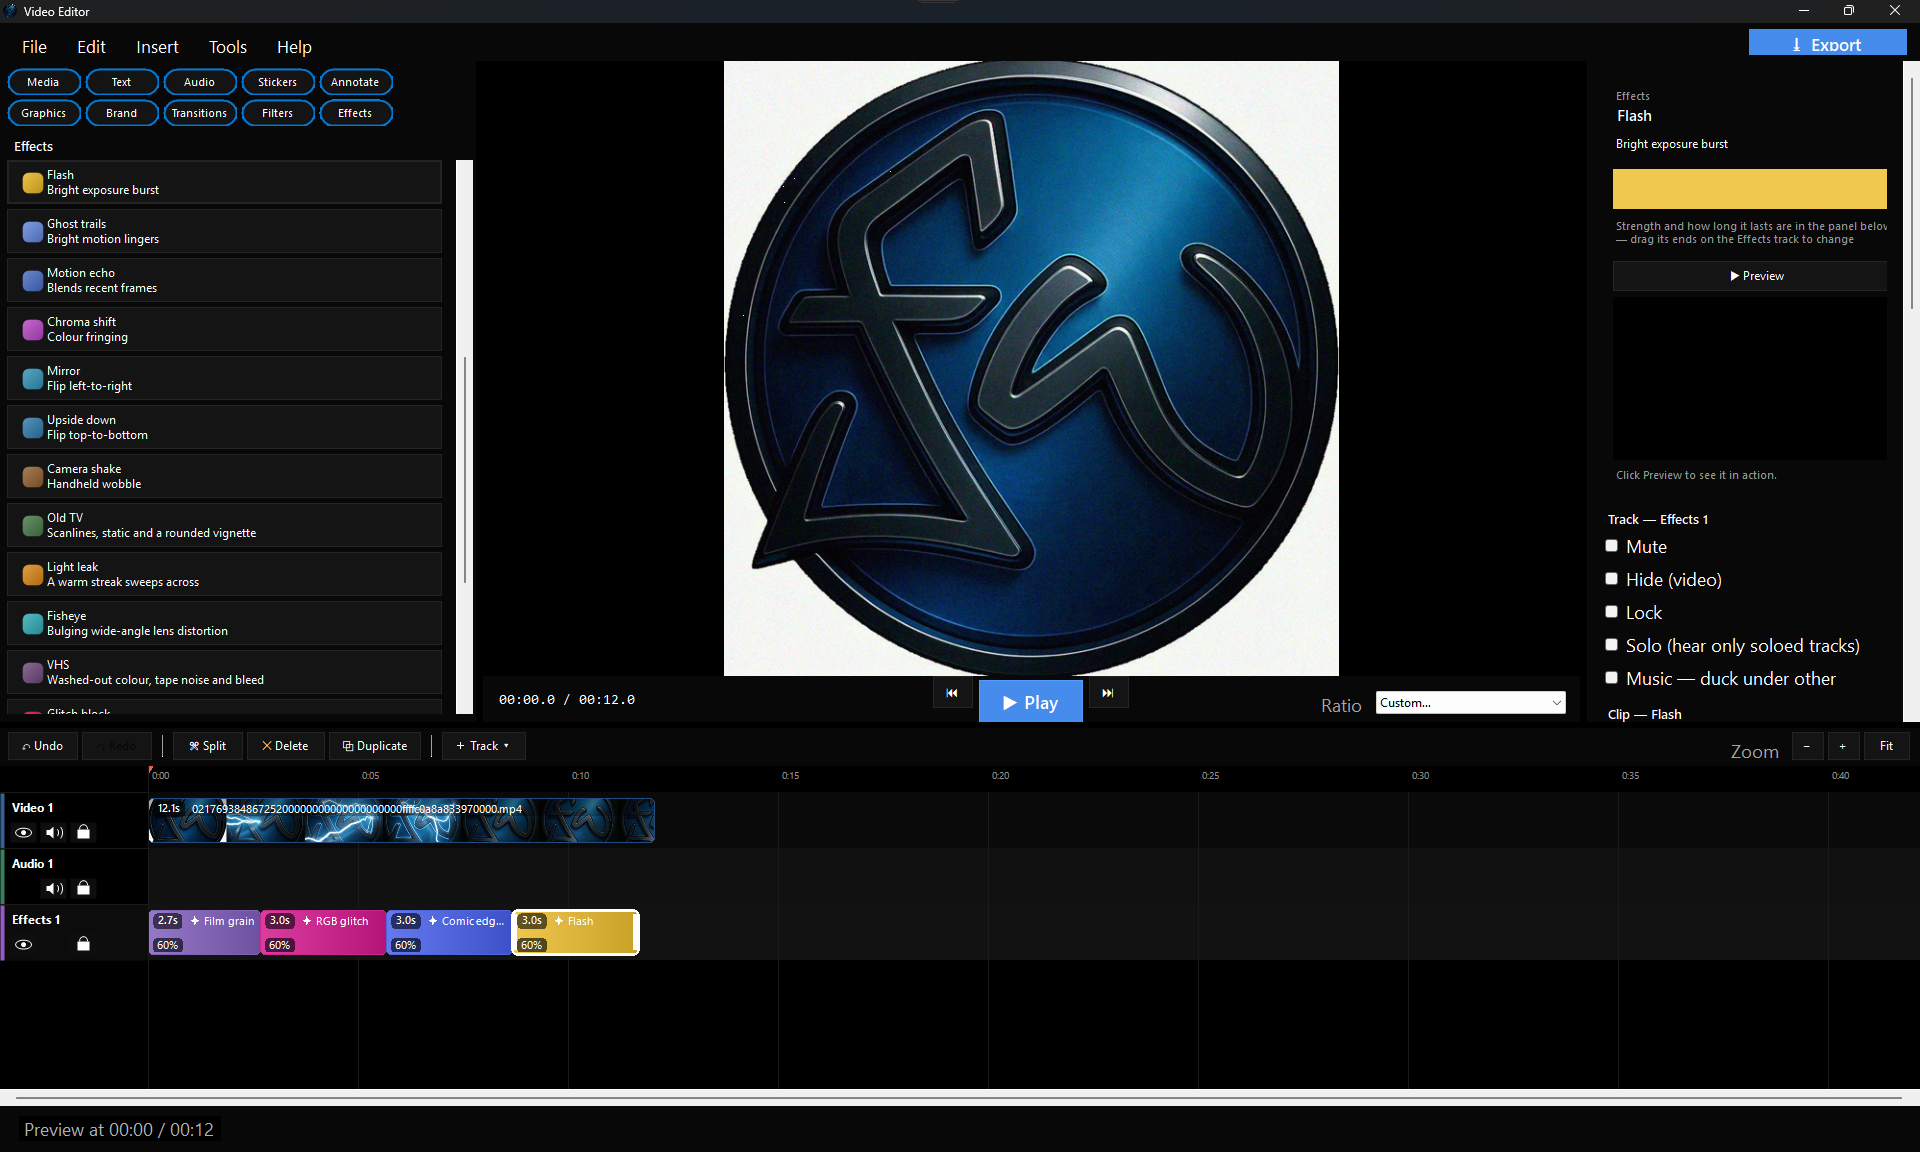
- Colour filters: Grayscale, sepia, sharpen, soft blur, brighten and boost-contrast — a quick look change in one click.
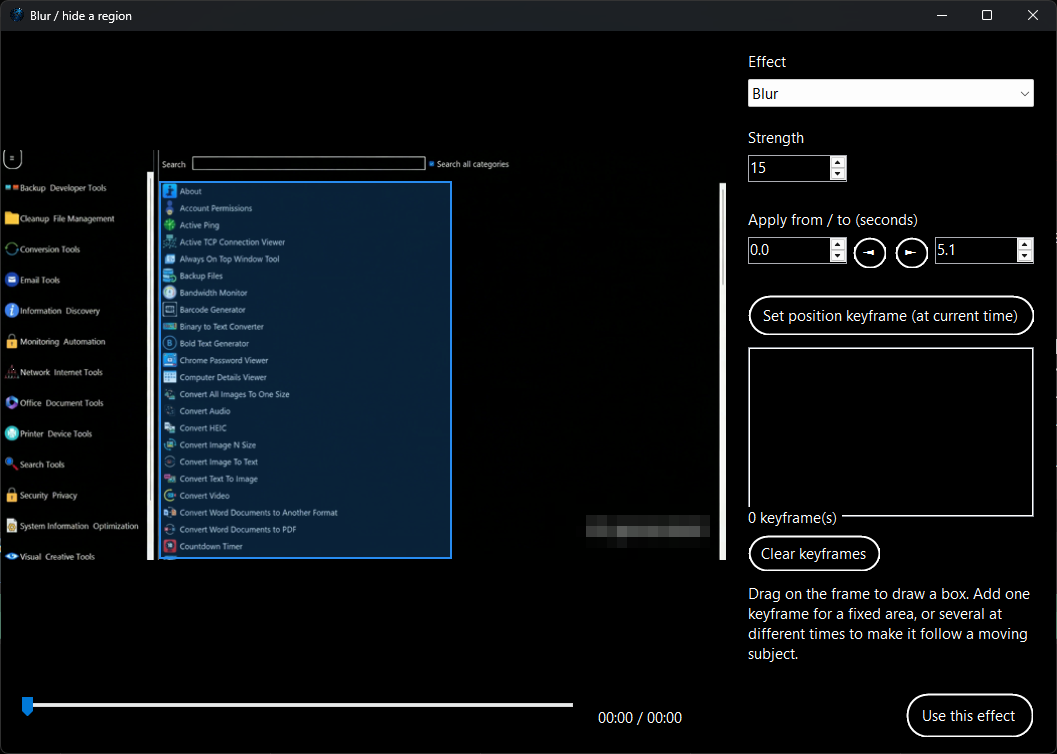
- Blur / hide a region: Cover a rectangle of the video with blur, pixelation or a solid box to hide a face, a name or a number. Blur and pixelation never go lighter than a safe minimum for the size of the box, so a face or number plate can't be recognised even at a low strength. Choose exactly how long it lasts, and if the thing moves, add position keyframes so the box follows it across the frame.
- Picture-in-picture: Drop a second video into a corner — a webcam over a screen recording, say — at the size and corner you choose.
- Chroma key (green screen): Knock out a green or blue background and composite your subject over another video.
- Auto-zoom follow: For screen recordings, record the cursor's path and the tool gently zooms in and pans to follow it — a polished, Screen-Studio-style effect with no manual keyframing.
- Image / logo overlay: Pin a logo or image to a corner of the video, for the whole clip or a set stretch of it.
Offline captions
Subtitle a video without the cloud. The
Captions action transcribes the speech in a clip to subtitles entirely on your own machine — nothing is uploaded. Save the result as a standard
.srt file to keep alongside the video, or burn the captions straight into the picture. (This one needs a free offline speech model set up once in Settings.)
The timeline
The timeline is the heart of the main window — a simpler, friendlier take on the big editors. Stack as many tracks as you like: video and images layer on top of each other, audio tracks mix together, and text and effects sit over the top.
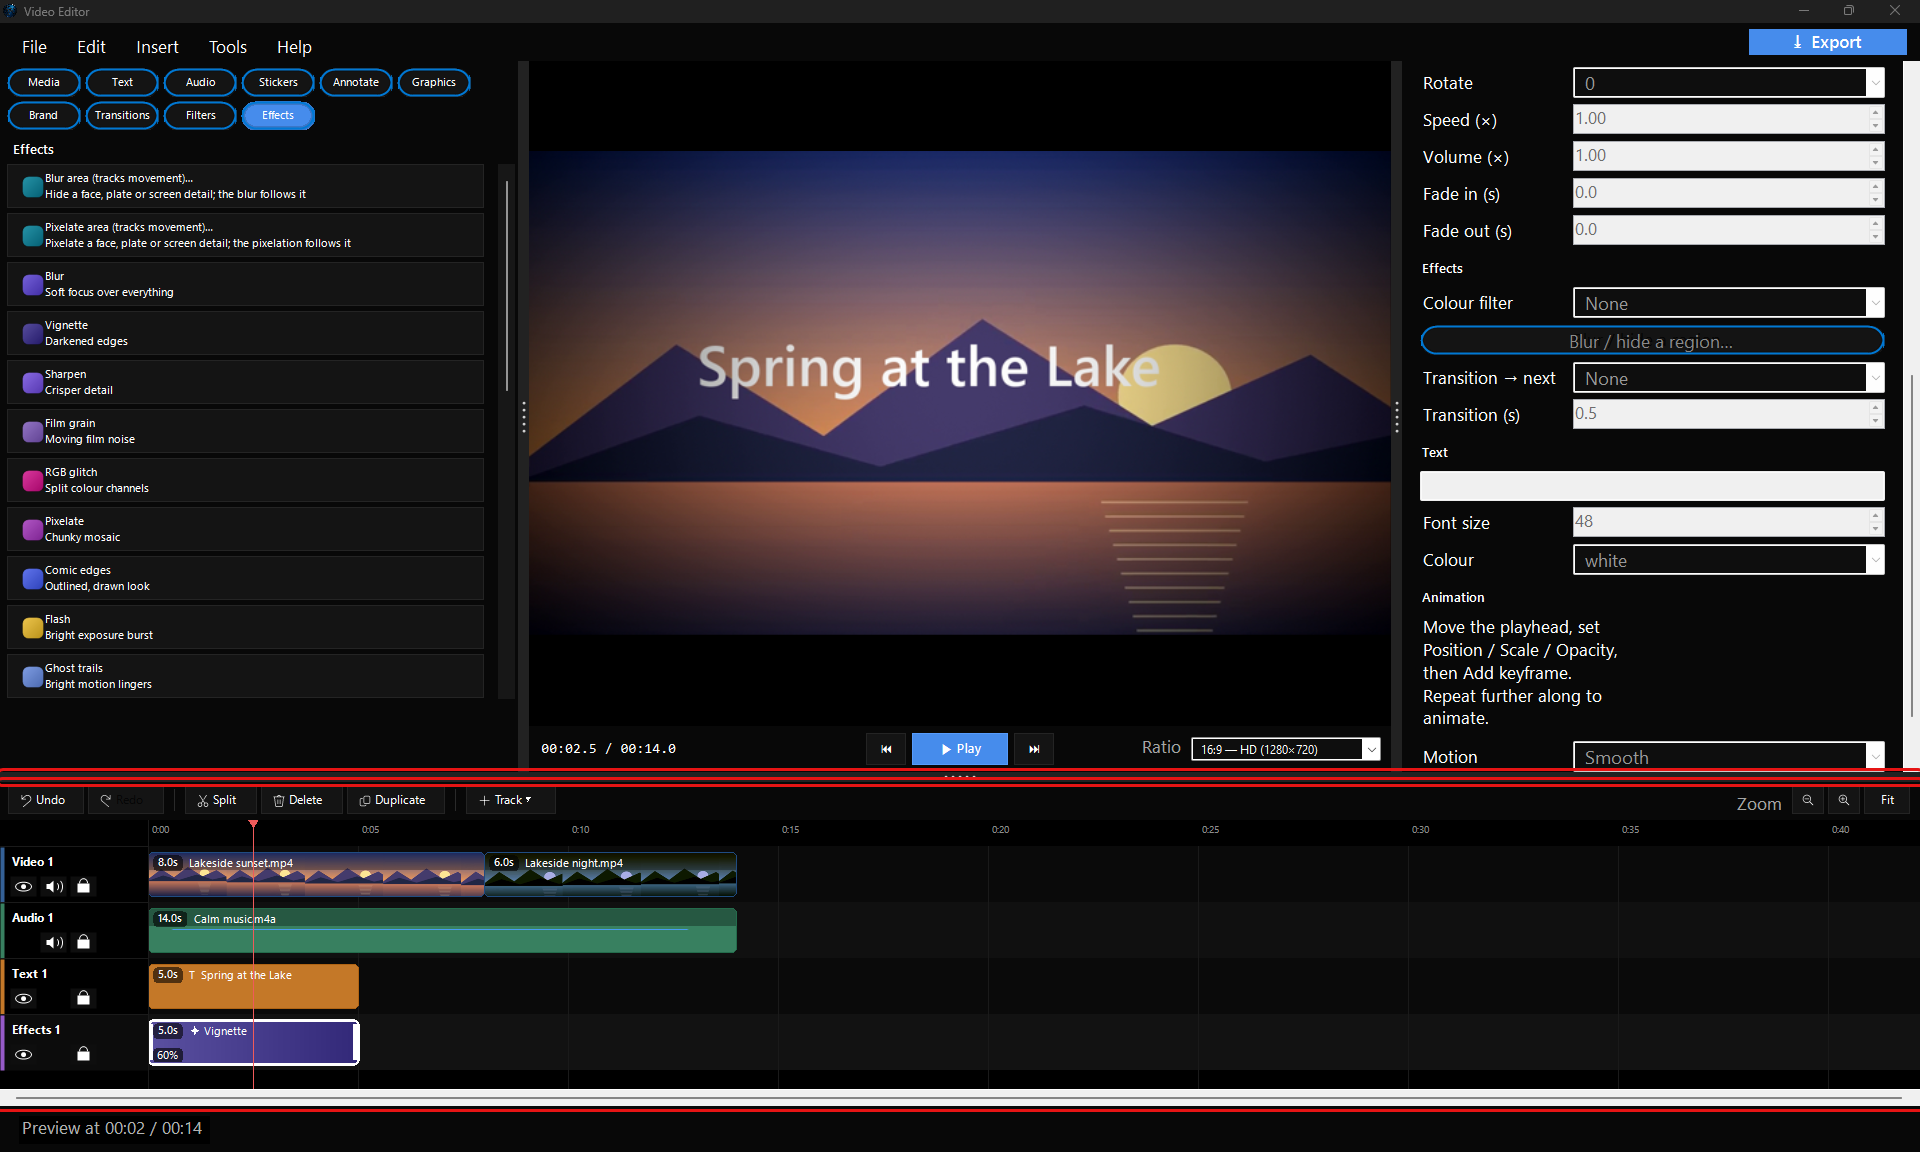
- Layer everything: Multiple video, image, audio and text tracks — a smaller clip on a higher track is picture-in-picture for free, and the audio tracks mix down together.
- Drag and trim: Drag clips along a track or across to another, and drag their edges to trim — with snapping to the playhead and to other clips so cuts line up cleanly.
- Split and arrange: Split a clip at the playhead, delete, and rearrange, with zoom and scroll — both across and, when you've stacked a lot of tracks, up and down — to work up close or see the whole thing.
- Per-clip properties: Set each clip's position, scale, opacity, rotation, speed, volume and fades, add a colour filter or a moving blur/redact region, and choose its transition — all in a panel on the right.
- Thumbnails and waveforms: Video and image clips show a preview frame and audio clips show their waveform, so the timeline is easy to read at a glance.
Browse effects like the big apps — a tabbed library
Everything you can add, laid out to browse. The timeline has a built-in effects library styled after apps like CapCut: a strip of tabs —
Transitions,
Filters,
Effects,
Captions, and
Text,
Audio and
Media — and, under each tab, a scrollable list of every option it holds. Click an item and its own settings open right there in the
Details panel next to it, so you set it up and apply it without hunting through menus.
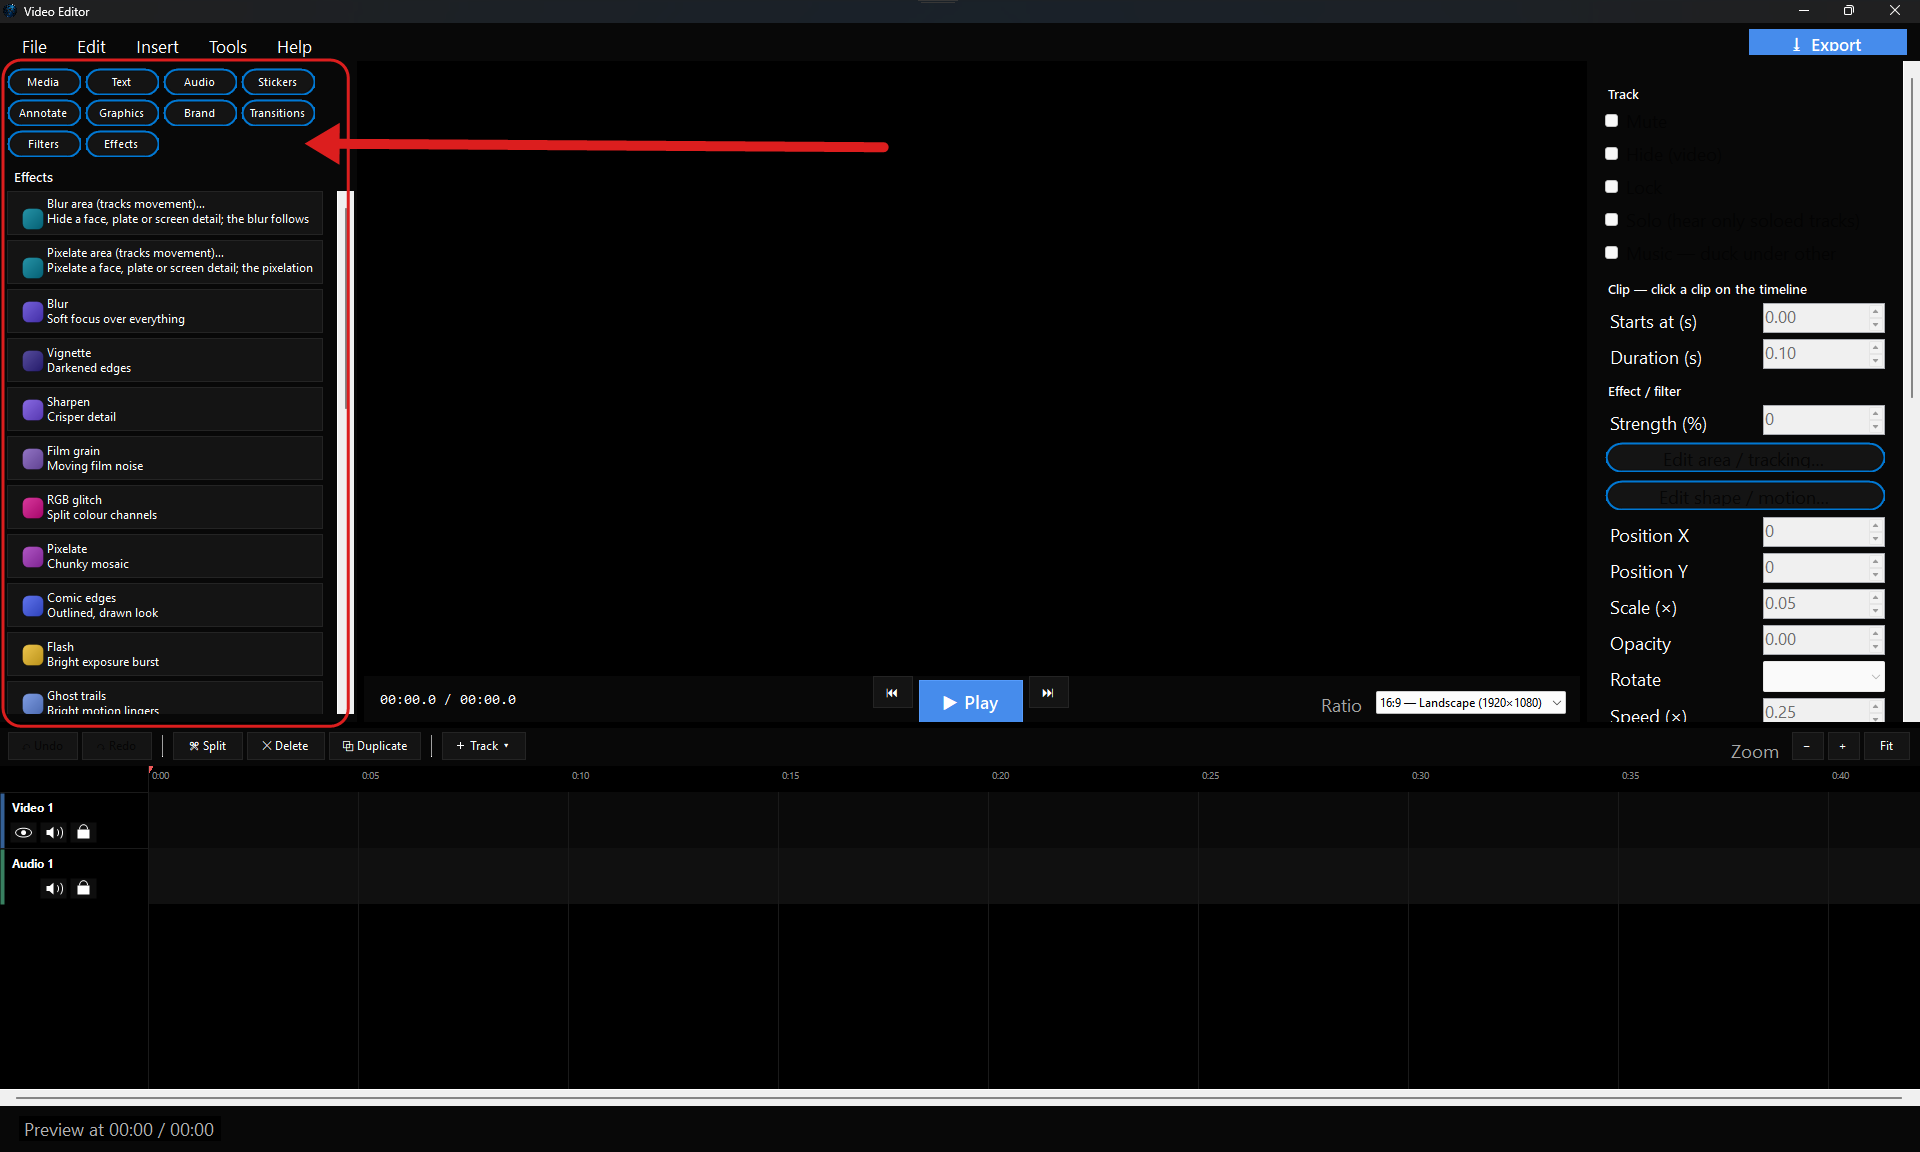
- Tabbed categories: Flip between Transitions, Filters, Effects, Captions and the Text, Audio and Media tabs to find what you're after, each one listing every option it offers.
- Settings in the Details panel: Click any item in the list and its controls appear beside it — a duration for a transition, a strength for a filter, a colour for a title — so you can dial it in and apply it on the spot.
- Resize it to suit you: Drag the dividers between the library, the preview, the properties panel and the timeline to give each part the room you want. See Make the panels bigger or smaller just below.
Make the panels bigger or smaller
The Video Editor window has four parts: the
library on the left (effects, transitions, text and your media), the
preview in the middle, the
properties panel on the right (the settings of the clip you picked) and the
timeline along the bottom. Between them are
dividers: thin bars with a short row of dots in the middle. You can drag a divider to make the parts beside it bigger or smaller.
1. Find the divider you want. The one
above the timeline runs across the window; the two others run up and down, one between the library and the preview, one between the preview and the properties panel.
2. Point at it with the mouse. It lights up in your accent colour, the pointer changes to a double arrow, and after a moment a tip explains what it does.
3. Hold the left mouse button down and move the mouse:
- the divider above the timeline: up gives the timeline more room (handy when you have many tracks), down gives the preview more room;
- the divider beside the library: right makes the library wider, left narrower;
- the divider beside the properties panel: left makes the panel wider, right narrower.
4. Let go of the mouse button. That's it — there is nothing to save; the size is remembered the moment you let go.
Example: Your project has two video tracks, a music track, a voice-over and some titles, so the timeline only shows half of them. Point at the divider above the timeline, hold the mouse button down and drag it up until the timeline fills about half the window. All the tracks now fit. Close the Video Editor; the next time you open it, the timeline is already that size.
How it works / what to expect
- The first time, the library and the properties panel each take about a quarter of the window's width and the timeline about a third of its height.
- Sizes are remembered as a share of the window, so a timeline set to half the window stays half the window when you maximise it, restore it or move it to another screen.
- Each part can be made as small as about a twentieth of the window, so a panel never disappears completely, and can't take more than about 85 % of it.
- Changing the sizes never changes your project — only how the window is laid out.
Troubleshooting
- I can't find the divider — move the mouse slowly over the edge of the timeline or a side panel until it lights up and the pointer becomes a double arrow. Look for the short row of dots.
- I made a panel too small — drag its divider back the other way. A panel always keeps a thin strip, so its divider is still there to grab.
- The sizes didn't come back next time — the size is saved when you let go of the mouse button, so finish the drag by letting go, then close and reopen the Video Editor to check.
Transitions and playback
Blend one clip into the next, and watch the whole edit before you export it.
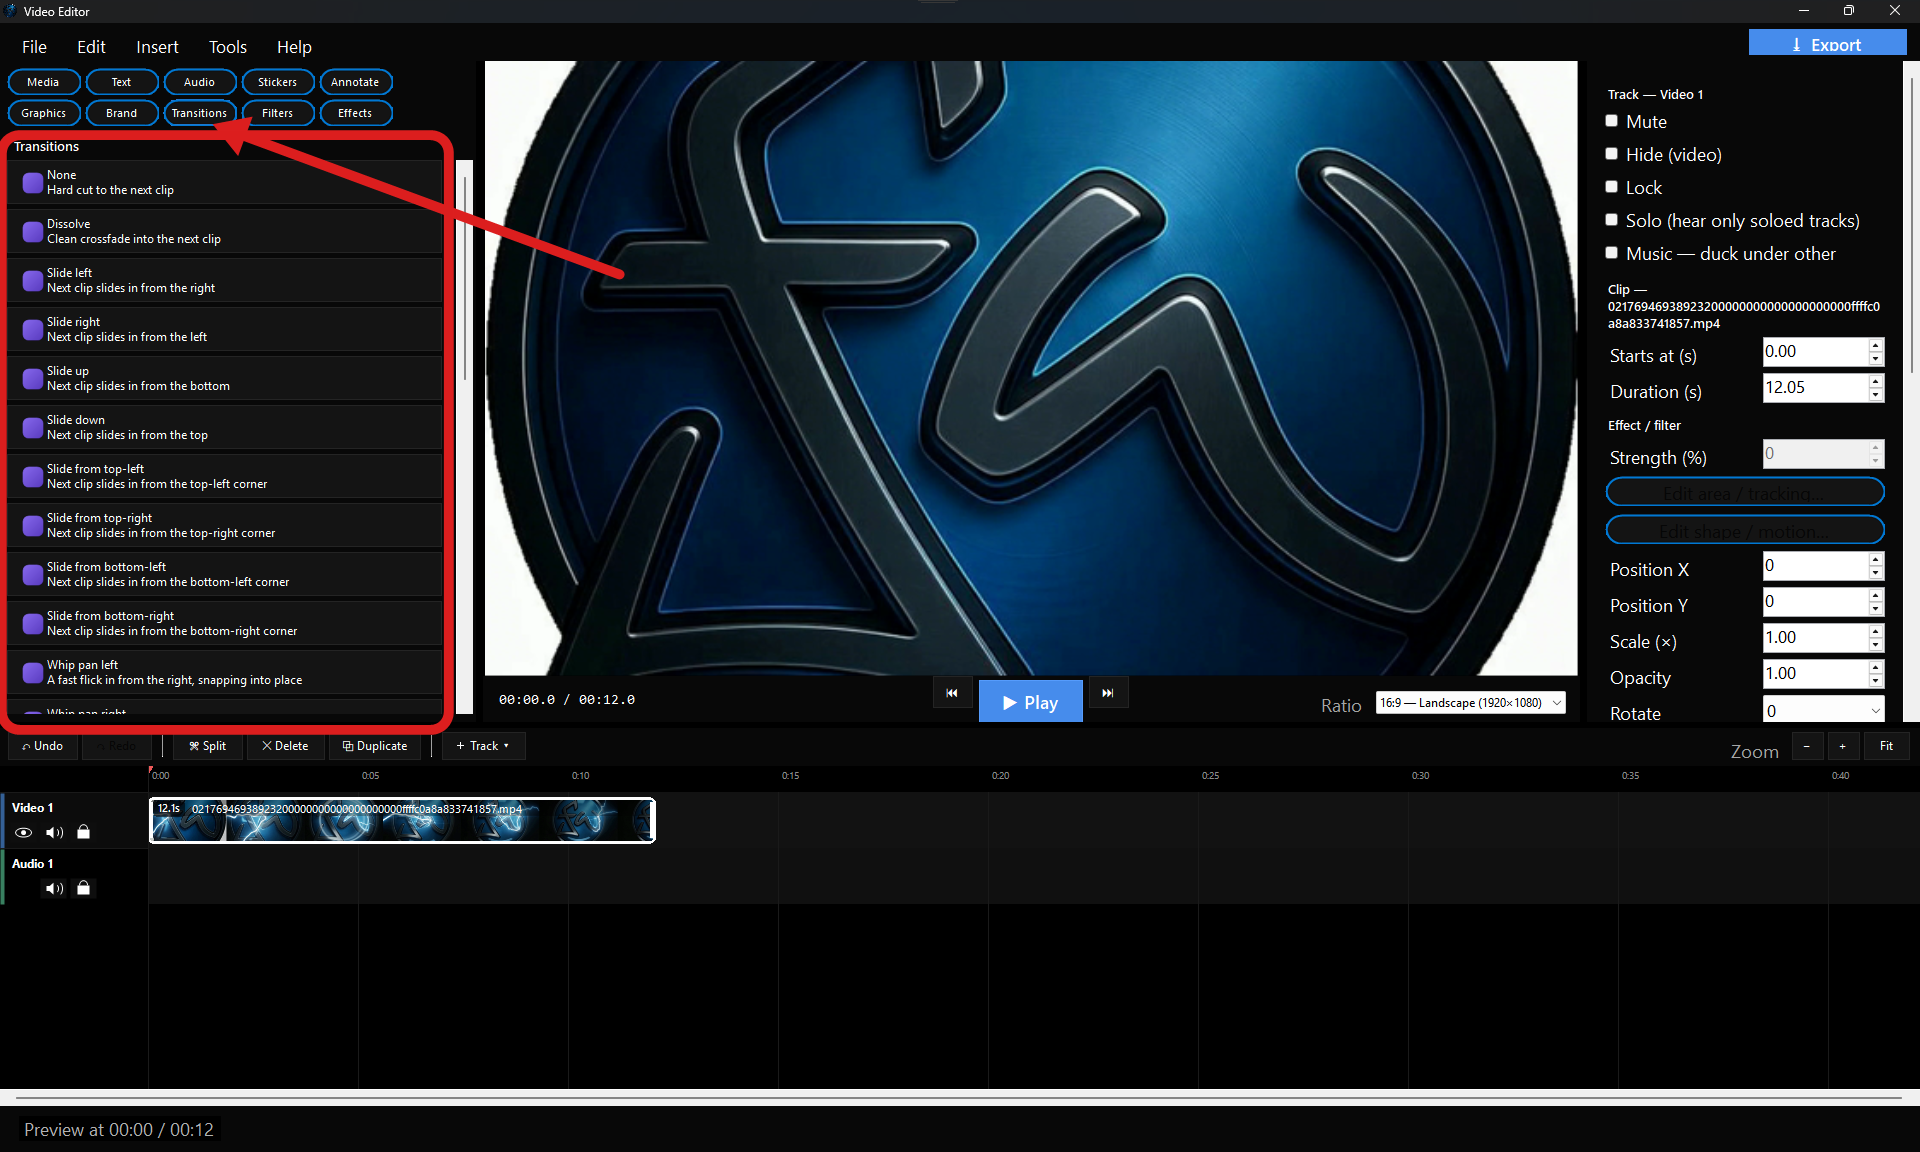
- Transitions: Blend adjacent clips on a track with a dissolve (a clean crossfade) or a slide from any of the four directions, for as long as you set.
- Text and titles: Add text over the video for a set stretch — a title, a caption, a lower-third — in the size and colour you pick.
- Scrub and play: Scrub the timeline for an instant composed preview, or press Play to watch it back smoothly — the tool builds a quick preview behind the scenes and remembers it until your next edit.
- Export one file: When it's right, export the whole timeline — every track, effect and transition — to a single video, with progress and a cancel.
Animate with keyframes — moving titles, zooms and fades:
Make things move. A
keyframe is simply a marker that says “at this moment, the clip should look like
this.” Set two or more and the editor glides smoothly between them — so a title can slide in, a photo can drift and zoom, or a clip can fade up. You can animate a clip's
position (slide it across the frame), its
scale (a slow push-in or pull-out — the classic
Ken Burns move on a still photo), its
opacity (a gentle fade in or out) and its
rotation (a smooth spin from one angle to another — set a Rotate value at the start and a different one at the end and it turns evenly between them).
 How to animate something — four steps:
- 1. Go to the start: Select the clip or title, then move the playhead to the moment where you want the movement to begin.
- 2. Set the look and add a key: Set its position, scale or opacity, then click Add keyframe to pin those values to that moment.
- 3. Go to the end and change it: Move the playhead forward, change the values (drag it to a new spot, zoom it in, make it see-through, or spin it to a new angle), and add another keyframe.
- 4. Pick the feel: Choose Linear for a steady, even move or Smooth for an ease in and out. Press Play to watch it, and Clear to remove the animation and go back to a still clip.
Keyframes are built to grow — the same set-a-value-at-a-time approach is designed to cover more properties over time, so the animation you learn here keeps working as the tool gains new tricks.
Aspect-ratio presets — make it fit where it's going
One click to change the shape of your video. Pick a preset for the finished frame and everything re-fits automatically:
widescreen 16:9 for YouTube and TVs,
tall 9:16 for phones, Reels, TikTok and Shorts, or
square 1:1 and
4:5 for Instagram. Your existing clips are re-centred and scaled to suit the new frame, so turning a landscape recording into a vertical clip for social is a single choice rather than a whole re-edit.
Mix your audio — volume, auto-ducking and solo
When narration, music and clip sound are all playing together, the timeline keeps the mix under control.
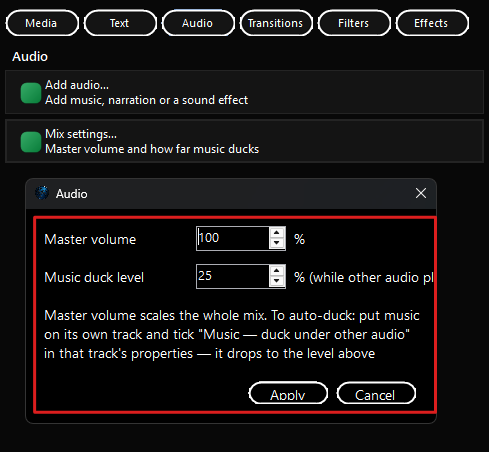
- Master volume: One slider for the overall loudness of the finished video — nudge the whole mix up or down.
- Auto-duck the music: Mark a music track to duck and it drops down automatically whenever someone is talking on another track, then rises back up in the gaps — so your voice is always clear over the background, with smooth fades and no manual volume-riding. You choose how far it dips.
- Solo a track: Click Solo to hear just that track while you work — handy for checking one layer without having to mute everything else by hand.
- Even levels: The background holds a steady level when a clip above it ends — no sudden jump in the music the moment a talking clip finishes.
Editing made easy — undo, shortcuts and copy & paste:
Experiment freely. The timeline has the everyday comforts you expect, so nothing you try is ever a dead end.
- Undo and redo: Step back and forward through your changes with
Ctrl+Z and Ctrl+Y — a deep history means you can try things without worry.
- Copy, paste and duplicate: Reuse a clip or title with
Ctrl+C and Ctrl+V, or make an instant copy with Ctrl+D.
- Keyboard shortcuts: Space plays and pauses, Delete removes the selected clip, the arrow keys nudge the playhead (hold Shift for bigger jumps), and Home / End leap to the start or end.
Saving, exporting and projects
Every result is a new file. Quick actions, effects and timeline exports all write a fresh video to your output folder — your source clips are left exactly as they were.
Editable projects. Keep your work as a project and reopen it later to keep editing rather than starting over — a
.fwtl file for a multi-track timeline (and
.fwvid for the simple join-clips timeline) — so the arrangement, effects, keyframes and transitions all come back just as you left them.