Screenshot Recorder - Capture your screen any way you like and mark it up with a full annotation editor (Updated Nov 2026)
Only need this one tool? It’s also sold on its own as
FW Screenshot Recorder in the Microsoft Store — a one-time purchase with no subscription and no in-app purchases.
Description
The Screenshot Recorder captures your screen — a region you drag out, a whole monitor, every screen at once, a timed shot, or a
scrolling full-page grab of a window that's taller than the screen — and it can
record the screen as well. It can sit quietly as a small always-on-top
edge toggle tucked against the side of any screen and slide out the capture options the moment you hover it, so a screenshot is never more than a flick of the mouse away. Whatever you capture opens straight into a proper annotation editor, so you can point things out, cover up what shouldn't be seen, and drop on stamps and watermarks before you send it.
The editor is the heart of the tool. You get arrows in every style, lines, boxes and ellipses, a highlighter, a freehand pen, text, auto-numbered step badges, and a blur/redact tool for hiding sensitive details. On top of that there are ready-made
stamps, your own
image stamps, and a
Marks menu for text watermarks, custom badges and dynamic date / file-name stamps — all with presets you can save and reuse. There's even built-in
OCR to pull the text back out of a screenshot. When you're done you can save the image, copy it to the clipboard, or keep an editable project to come back to.
Before you start — requirements
Nothing extra is needed. Capturing, editing, saving and recording all use what's already on your PC — there is nothing to install.
Run as administrator. As with the rest of FW Admin Tech Tools Pro, run the app as administrator so it can capture every window cleanly, including elevated ones.
OCR language data (optional). The
Extract text (OCR) feature reads text out of a capture using an in-built engine. It needs a
tessdata folder (with
eng.traineddata) alongside the app; this ships with the tool, and the same engine powers OCR across the suite.
Where your settings and stamps live. Your captures are saved to the output folder you choose (your
Pictures folder by default). Your own stamp images live in a
Stamps sub-folder there, and saved mark presets are stored under
%LOCALAPPDATA%\FWAdminTechToolsPro\TechTools. That folder is tied to the product rather than the version, so your stamps and presets are kept when you update the app.
The main window
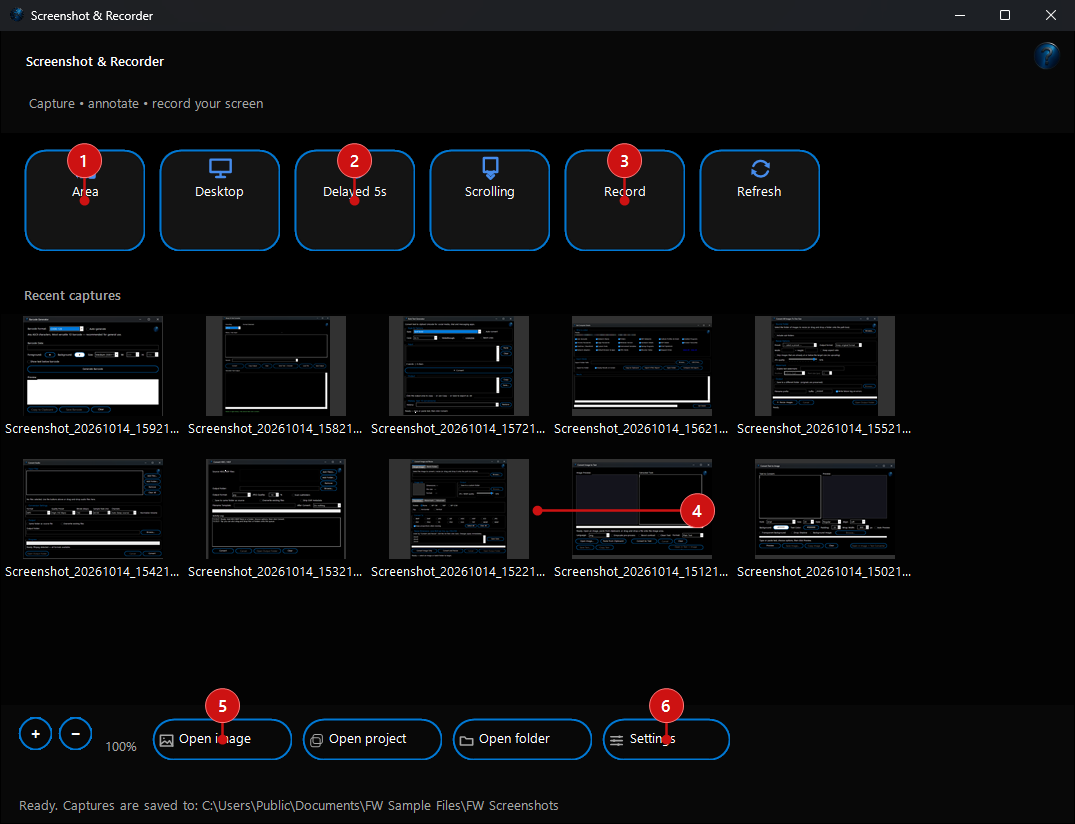 1–3. Capture tiles
— Area, Desktop, Delayed, Scrolling, Record and Refresh.
4. Recent captures — double-click one to open it in the editor; zoom the thumbnails with + and −.
5. Open image, Open project and Open folder.
6. Settings — captures folder, delay, flash, clipboard and auto-save, the edge toggle and more.
The main window is your launch pad: a row of big capture tiles across the top, a small bar of buttons for opening an image, opening a saved project, opening your captures folder and changing settings, and a gallery of your recent captures underneath. Pick a capture method and, a moment later, your shot opens in the editor. You can make the recent-capture thumbnails larger or smaller with the
− /
+ buttons on the gallery bar (or hold
Ctrl and roll the mouse-wheel over them), and it remembers the size you pick for next time.
The floating edge toggle — capture without the window in the way:
Most of the time you don't want a whole window sitting open just to grab a screenshot. So the tool can run instead as a small
edge toggle: a slim, always-on-top handle that clings to the side of your screen and stays out of the way until you need it. This is how the Screenshot Recorder starts by default — the full window only comes forward when you actually take a shot. Only one Screenshot Recorder runs at a time: opening it again simply brings back the one that is already running.

- Hover to reveal: Leave your mouse over the handle and a compact flyout slides out with the five capture options — Area, Desktop, Delay, Scroll and Record — the same actions as the main window, just smaller. Move away and it tucks itself back to a slim tab.
- Stays put until you move it: The handle holds its spot on the edge — hovering it opens the options around it without shifting it. It only moves when you drag it.
- Drag it anywhere on any edge: Pick it up and drop it against any edge of any monitor; it snaps to the nearest one and remembers where you left it for next time.
- Shows you where it is: Each time the tool starts, the toggle gives a quick visual nudge — it pulses and pops up a little labelled bubble pointing right at it — so you always know where it's hiding, even weeks later. The reminder clears itself after a few seconds, or the instant you hover or move the handle.
- Right-click for more: Right-click the handle for Open Screenshot Recorder main window (bring the full tool forward) and Exit.
- The full window when you need it: Take a shot or a recording and the main window comes forward on its own to show the result in the editor and gallery — then you're back to the toggle. You can turn the toggle off in Settings if you'd rather always start with the full window.
Ways to capture
There's a capture mode for every situation — use whichever fits.
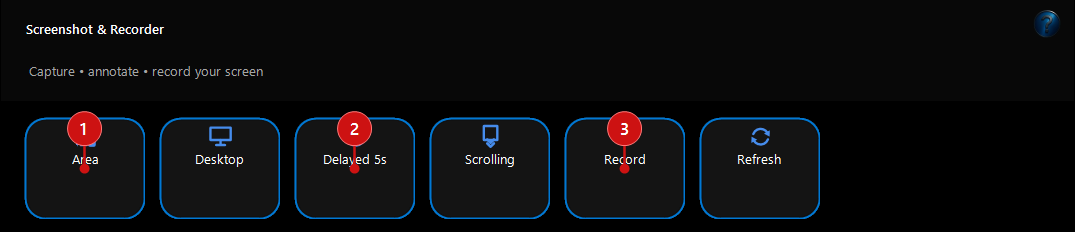
- Capture Area: Dim the screen and drag out just the region you want. A live read-out shows the size as you go.
- Capture Desktop: Grab the whole desktop — and across a multi-monitor setup, every screen at once. Captures and recordings are taken at your screen's full resolution whatever its display scaling (100 %, 125 %, 150 % and so on), including setups where each monitor is scaled differently.
- Delayed: A timed capture for things that only appear once you start using an app. Click it and the countdown starts straight away — open the menu, hover the tooltip or bring up the window you need. When the count reaches zero the screen freezes exactly as it is, and you drag an area or click a window on that frozen picture, so the menu is still in the shot even though it closes. Right-click the button for quick presets (3, 5, 10, 15, 20 or 30 seconds), or to choose the area before the countdown instead; click the countdown to cancel.
- Scrolling: Capture a whole web page or document that's taller than the screen as one tall picture. It goes to the top of the page by itself, scrolls down to the end and joins everything together — the browser's tabs and address bar and any menu bar that stays at the top of the page appear once, not on every screenful. It works with maximised windows, and Esc stops it early and keeps what it has so far. See How to capture a whole long web page below for step-by-step instructions.
- Record: Record the screen to a video, with a small on-screen recording bar to stop and control it.
- Refresh: Reload the Recent captures list on demand. The list also refreshes by itself whenever you bring the window forward, if screenshots have been added, removed or changed in the watched folders since you last looked.
After a capture. A gentle camera-style flash confirms the grab (you can turn it off). Depending on your settings the raw shot can be copied to the clipboard and auto-saved to your captures folder straight away — and then it opens in the editor for markup.
How to capture a whole long web page (scrolling capture)
Use this when the page you want is longer than your screen — a news article, a long form, an online receipt or a chat history — and you want all of it in one picture.
- Open the page. Open the web page or document in your browser or app. It can be maximised (full screen) or in a smaller window — either is fine. You don't need to scroll to the top first; the tool does that for you.
- Click once on the page. Click on a blank part of the page (not on a link or button). This makes sure the page is the one that will scroll.
- Start the scrolling capture. In the Screenshot Recorder window click Scrolling, or hover over the floating edge toggle and choose Scroll. The screen dims and short instructions appear at the top.
- Choose what to capture. Hold down the left mouse button and drag a box over the part of the page that scrolls — just the page itself, leaving out the browser's tabs, address bar and bookmarks. Let go of the mouse button. (You can also simply click the window to capture all of it; the tabs and address bar then appear once at the top of the picture.)
- Let it work — hands off. The page jumps to the top and then scrolls down by itself, one screenful at a time. Don't move the mouse or press any keys until it finishes. A long page can take 10–30 seconds. To stop early, press Esc — you keep everything captured so far.
- Check and save. When it finishes, the tall picture opens in the editor. Scroll through it to check it, add any arrows or notes, then save or copy it as usual. The status line tells you how many screens were joined together.
If it only captured one screen. A message tells you when the page didn't scroll. Click once on a blank part of the page, then try again and drag over just the page (not the tabs or address bar). Check that the page really is longer than the screen — it has a scroll bar on the right. A few programs can't be scrolled from outside, such as some games and remote-desktop windows.
Tips for the best result. Close pop-ups and cookie banners before you start. Pages with moving pictures or videos can stop the capture early — pause the video first. Very long pages stop at about 30,000 pixels tall (the status line says so) — zooming the page out in your browser (Ctrl and minus) fits more of it in.
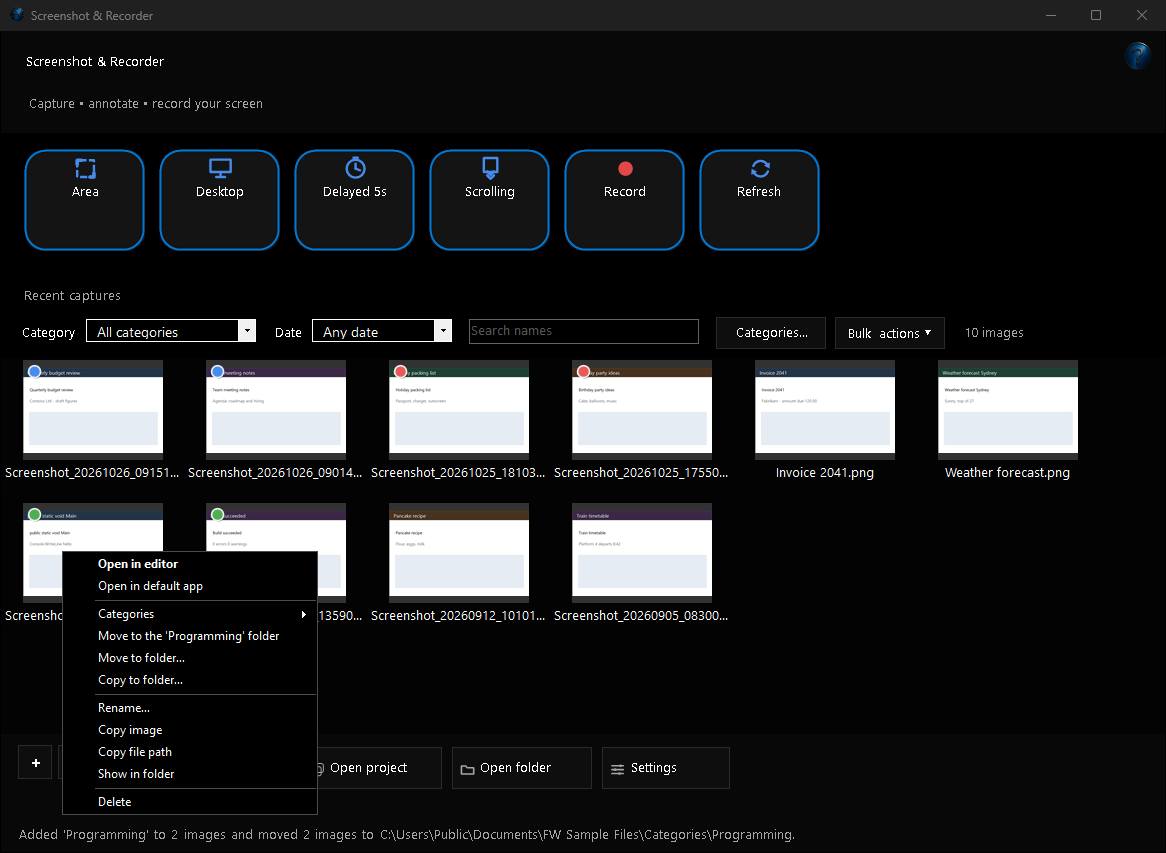
Categories — sort, filter and move your screenshots
Put screenshots into your own categories, such as
Work,
Personal or
Programming, then show just one category, or move a whole category to a folder in one go — without opening each picture. New captures are never put in a category for you, so taking several quick screenshots is as fast as ever; you sort them later, only if you want to.
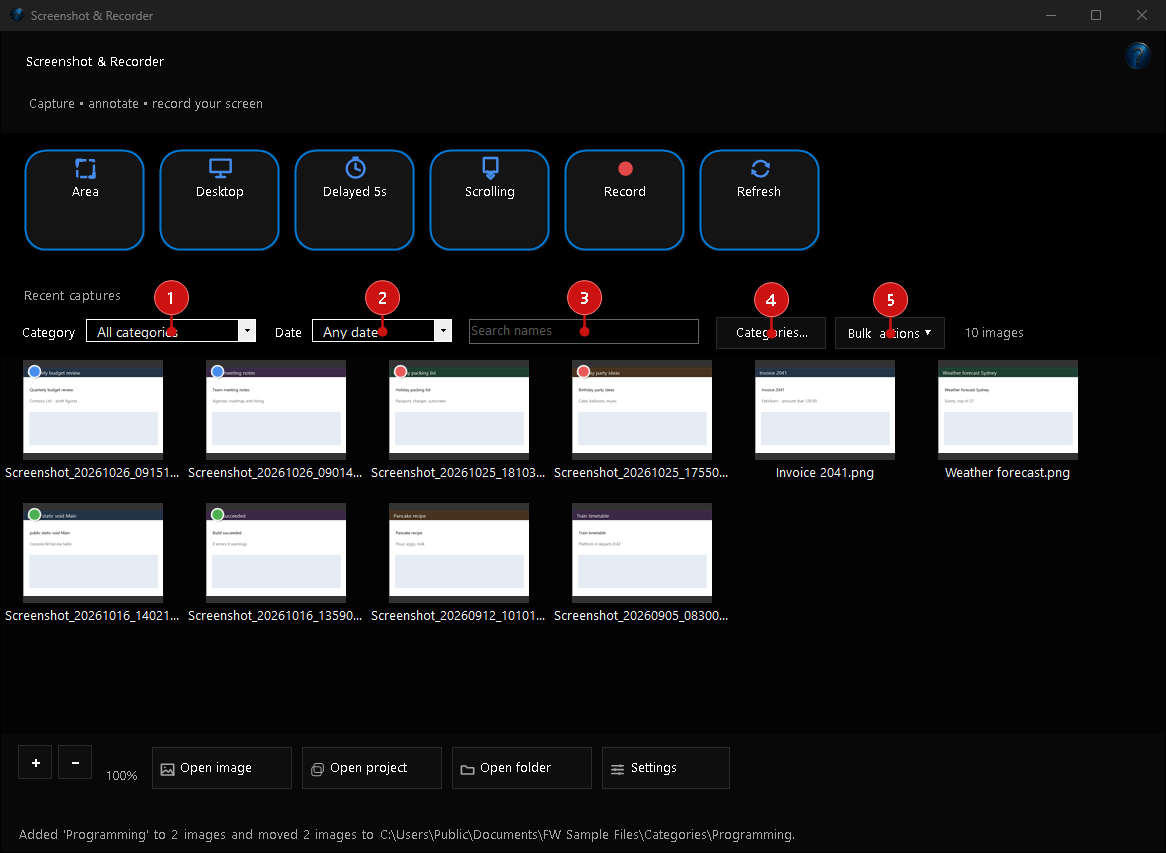
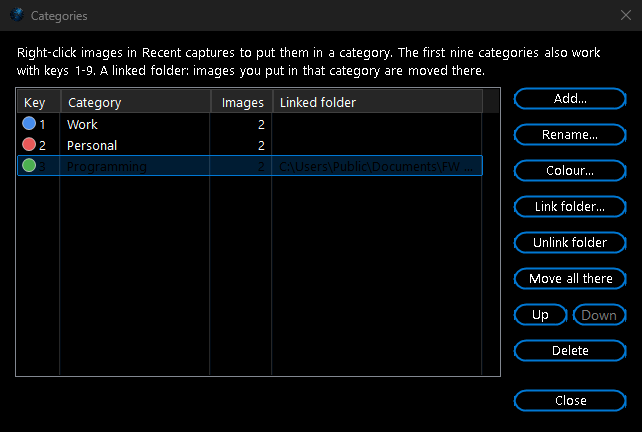
- Create your categories. Click Categories… above Recent captures, then Add… and type a name. Each category gets its own colour (change it with Colour…); Up and Down change the order.
- Choose the images. Click a thumbnail, or hold Ctrl and click several (hold Shift to pick a run of them; Ctrl+A picks all of them).
- Put them in a category. Right-click one of the chosen images and open Categories, then click a category. Click it again to take it off. An image can be in more than one category. Remove all categories clears them, and New category… creates one and adds it straight away.
- See them at a glance. Each thumbnail shows a small coloured dot for every category it's in; hover over a thumbnail to see the category names.
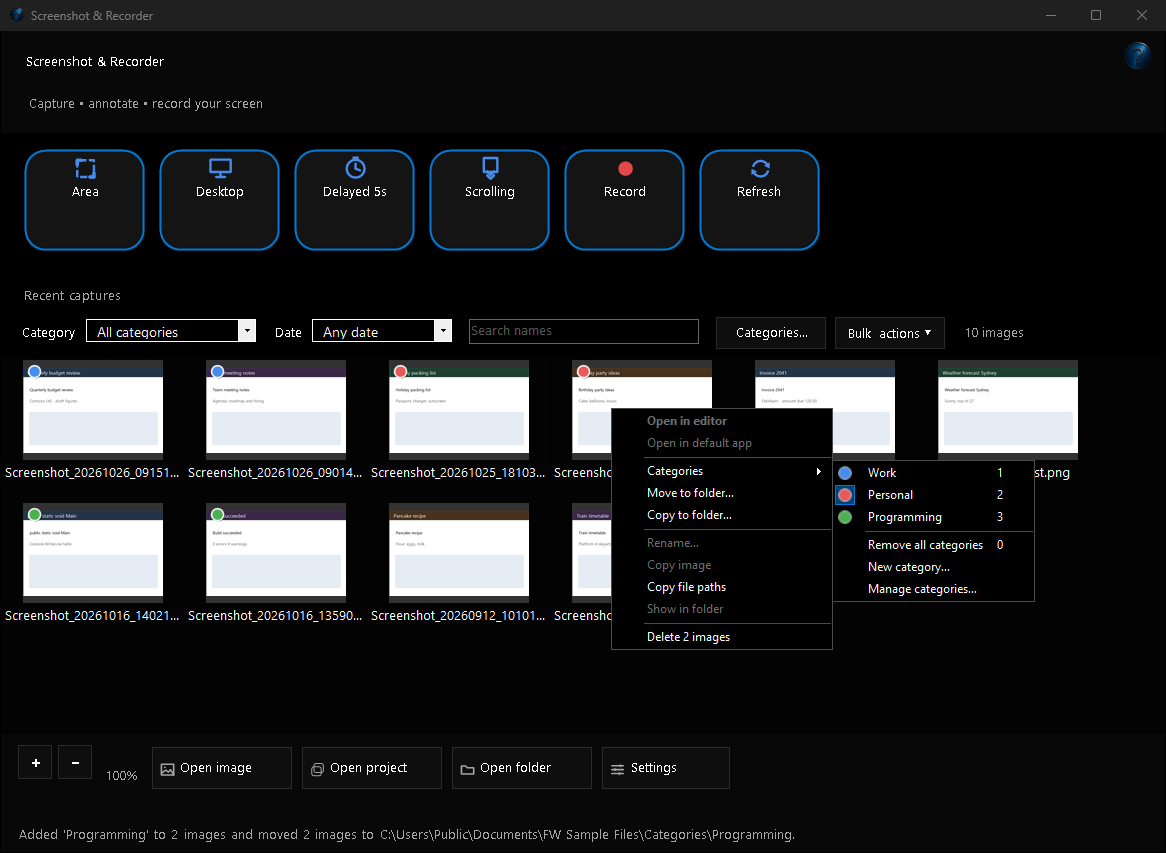
- Quick keys: With images chosen, press 1 to 9 to put them in the first nine categories (press the same number again to take it off) and 0 to remove all their categories. The numbers are shown next to each category in the menu. Turn the keys off in Settings if you don't want them.
- Filter: The Category list shows one category, or Uncategorised for everything you haven't sorted yet. The Date list narrows it to today, yesterday, the last 7 or 30 days, this month, this year or older than 30 days. The search box finds file names and category names as you type (Ctrl+F jumps to it, Esc clears it). The count beside them shows how many images match.
- Bulk actions: Bulk actions works on every image the filter shows, even ones further down the list that haven't loaded yet: add or remove a category, remove all categories, move or copy them to a folder, copy their file paths, or delete them. For example, choose Work in the Category list, then Bulk actions > Move to folder… to move all your work screenshots at once. The right-click menu offers the same move, copy and delete for just the images you've chosen.
- A folder for a category: In Categories…, choose a category and click Link folder…. From then on, when you put an image in that category it is moved into that folder for you, and that folder's images are shown in Recent captures too. Linking asks before it moves the images that are already in the category — all of them, wherever they are: also ones in sub-folders, in folders Recent captures doesn't show, and ones further down the list that haven't loaded yet. Unlink folder stops it.
- Move a whole category later: If some images in a linked category are somewhere else (for example you moved them out, or they were put in the category before you linked the folder), choose the category in Categories… and click Move all there, or use Bulk actions > Move a whole category to its folder. You're told how many will move and how many are in folders Recent captures doesn't show, and nothing moves until you say yes. Images already in the folder stay put. The Images count in Categories… counts every image in the category, wherever it is.
Example: your Work category is linked to Documents\Work screenshots, but 12 work screenshots are still in Pictures\FW Screenshots and 3 are in Desktop\Old. Click Move all there: the message says 15 images will move (3 of them from folders Recent captures doesn't show); click Yes and all 15 end up in Documents\Work screenshots, still in Work.
- Move one image to its category folder: Right-click an image that is in a linked category but not in that folder yet and choose Move to the 'category' folder (if it is in several linked categories, pick the folder from the list). The item only appears when there is somewhere to move it. Choose several images first to move them together.
- If an image doesn't move: it may be open in another program (close it and try again — you're shown which ones couldn't be moved), or it was renamed or moved in File Explorer, which takes it out of its categories; put it back in the category and it moves. A file with the same name already in the folder is never replaced: the moved one gets a number, such as Invoice (2).png.
- Undo: Moves and deletes are recorded in the Change Journal, so you can undo them from there; deleted images go to the Recycle Bin. Categories follow an image when you move, copy or rename it in the Screenshot Recorder (if you rename or move it in File Explorer it becomes uncategorised).
- Search the text inside screenshots (optional): Tick Search the text inside screenshots in Settings and the search box also finds words that appear in your pictures — an invoice number, an error message, a name in a chat. The text is read once per image in the background while the window is open (the count shows its progress) and is kept on this PC only. It's off unless you turn it on, so it never slows anything down otherwise, and turning it off deletes the saved text. Very large scrolling captures are skipped.
The annotation editor
Every capture opens here. The tools are grouped into labelled menus along the top — Select, Add (shapes, drawing and text), Stamps, Marks, Style, Image, Edit (undo, redo and arranging marks), View and Export — that open as you hover (a click works too), so the whole toolset stays on one tidy bar instead of a crowded row; your image sits centered in the middle; a layers list on the right lets you pick, re-order and delete individual marks.
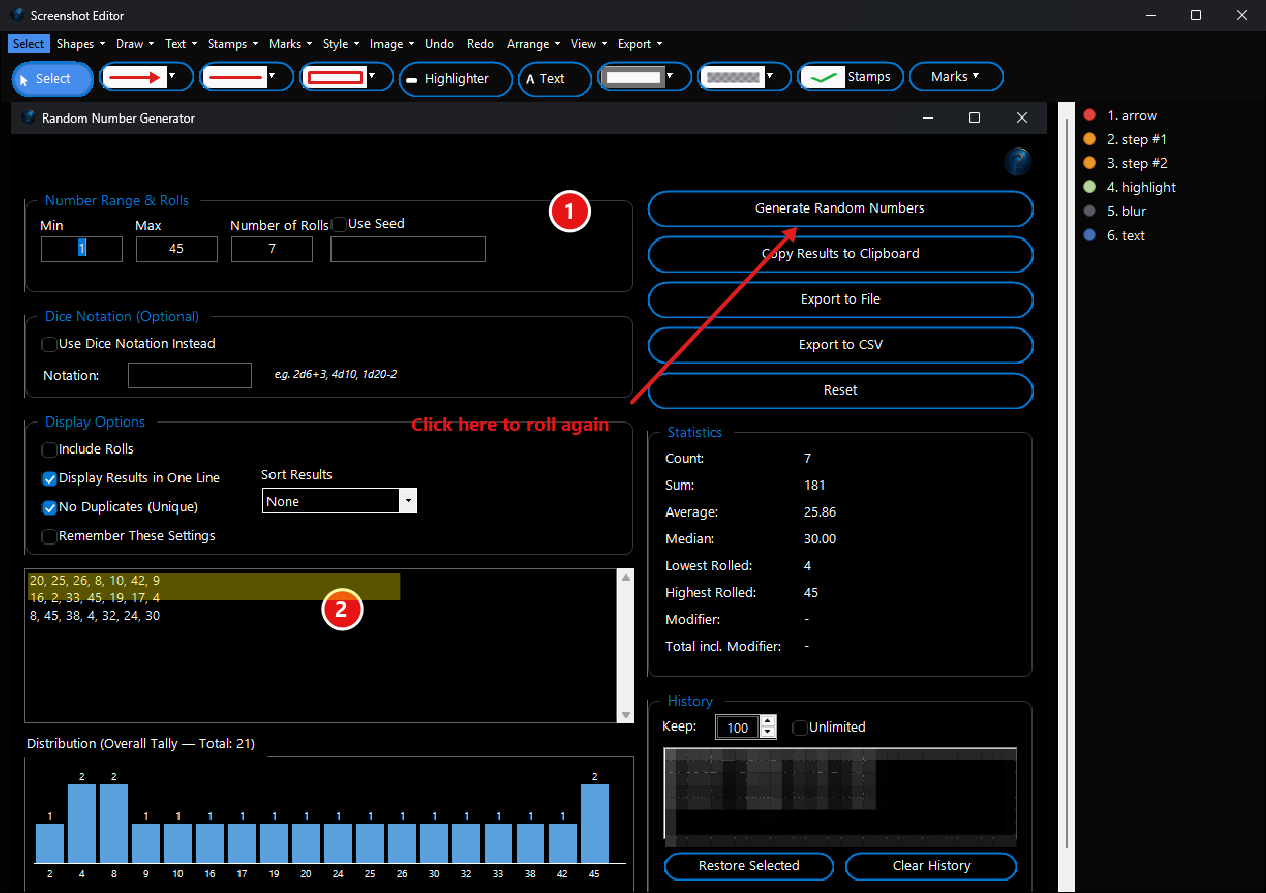
- Arrows and lines: Arrows in many styles — open, double-headed, block, diamond, dot, curved, barbed, chevron, arc and bar-end — plus straight, dashed, dotted, double, wavy and dimension lines, elbow connectors and brackets.
- Shapes: Rectangles in a whole family of styles — plain, rounded, dashed, dotted, filled, drop-shadow box, callout-style card and double-border — plus ellipses with an optional fill, a speech-bubble callout with a pointer tail you can drag to aim anywhere, a highlighter for marker-pen strokes, and a freehand pen.
- Text and steps: Type text straight onto the image (with a Text style dialog for font, size, bold / italic / underline, left / centre / right alignment, colour, an optional background, and an outline / halo that keeps the text readable on any background), and drop auto-numbered step badges (1, 2, 3…) to walk someone through a process.
- Blur, redact and focus: Cover a region so what's underneath can't be read — pixelate it, blur it, or drop a solid black bar over it — for hiding names, account numbers or anything sensitive before you share the shot. Over text, pixelate and blur automatically work out a strength from the size of the text, so even a high-resolution screenshot or a low strength setting leaves nothing readable. A spotlight (rectangle or ellipse) dims everything outside a region instead, to draw the eye straight to one spot.
- Colour, width and fill: Set the stroke colour and thickness, and choose whether shapes are filled; the step badge's fill and number colours are their own controls.
- Precision helpers: Pick a colour straight off the image with the eyedropper; hold Shift while drawing for perfect horizontals, verticals, squares and circles; and each tool remembers the colour and width you last used with it, so switching back picks up where you left off.
- Safe to Share — find and hide sensitive details automatically: One tap reads the image with the built-in OCR and flags anything that looks sensitive — emails, phone numbers, card numbers (checked with a Luhn test so real cards aren't missed), ID and long numbers, IP addresses, and API keys or tokens. You review the list and tick exactly what to cover — by category or item by item, each shown masked so the dialog itself doesn't reveal it — choose a black bar, blur or pixelate, and it drops permanent redactions over them in one step. Pick blur or pixelate and it re-reads the covered areas afterwards to confirm nothing's still legible, offering a one-click upgrade to solid bars.
- Select, arrange and edit: Drag a mark to move it, or drag one of its corner handles to resize it — with any tool picked, so you can fix a stamp or arrow straight after placing it (the pen and highlighter keep drawing over other marks; with them only the selected mark can be dragged). Switch to Select to restyle a mark; bring marks to the front or send them back; and use the Layers list to pick one exactly. Undo / redo covers everything.
- Eraser and bucket fill: Rub out a stroke, or flood-fill an area with a colour.
- Zoom and move around: Zoom in and out, fit the image to the width or to the whole window, or snap to 100%. Ctrl + mouse wheel zooms into the spot under the pointer. When the zoomed image is bigger than the window, move around it in any of these ways:
1. Use the scroll bars, the mouse wheel (up and down) or Shift + mouse wheel (sideways).
2. With the Select tool, press on an empty part of the image (not on a mark) and drag. The pointer turns into a hand when you can do this.
3. With any tool, hold down the middle mouse button (press the wheel) and drag, or hold Space and drag with the left button. Let go of Space to carry on drawing.
Example: you zoom to 300% to blur an email address in the bottom-right corner of a screenshot. Hold Space, drag the picture up and to the left until the address is in view, let go of Space and draw the blur over it.
Good to know: moving the view never moves or changes your marks, and it isn't added to Undo. When the whole image fits in the window there is nothing to move, so dragging an empty spot with the Select tool just clears the selection. If Space doesn't work, click an empty part of the image with the Select tool first, so the keys go to the picture and not to a toolbar button.
Stamps, marks and watermarks
Beyond the drawing tools, the editor has a library of
stamps and a
Marks menu for the document-style marks people ask for — all backed by presets you can save.
- Preset stamps: Ready-made marks — ticks, crosses, stars, warnings, circle badges (check / question / info / exclamation / no-entry), and handy object markers like a location pin, flag, padlock, heart and magnifier — plus rubber-stamp words such as APPROVED, REJECTED, CONFIDENTIAL and DRAFT.
- Your own stamps: Add your own PNG images (a logo, a signature, a mascot) to the stamp library and place them like any other stamp; manage or remove them at any time. Set each stamp's opacity with the Stamp % control.
- Text watermark: Lay a word (CONFIDENTIAL, DRAFT, DO NOT COPY…) faint and rotated across the whole image — tiled or a single centred stamp — with your choice of colour, opacity and angle.
- Image watermark: Tile any stamp image across the capture as a watermark.
- Custom badge stamp: Type your own framed badge in any colour and place it where you click.
- Dynamic stamps: Drop in today's date, the date and time, the file name, or a “Captured by” credit — filled in for you at the moment you place them.
- Saved presets: Save any watermark or badge as a named preset and reuse it later. Presets are stored per user and survive app updates.
Extract text (OCR)
Read the text off a shot. The
Extract text (OCR) action reads the text out of your capture — drag a box over just the part you want, or click once for the whole image — using an in-built recognition engine. It's the quick way to lift a code, a message or a paragraph out of a picture without retyping it. Text in any colour on any background colour is read — white on a blue banner, red on black, a dark-theme app, or a page with several coloured panels — because it looks at how much the text's colour differs from the background around it, not just how light or dark it is.
Safe to Share uses the same reading, so a card number in a coloured box is found too.
Saving, copying and projects
Save. The flattened image (your capture with all its marks baked in) can be saved as a PNG or JPEG.
Copy to clipboard puts the finished image straight onto the clipboard to paste into an email or chat.
Auto-save on close. When you close the editor it commits your work automatically — the edited image is saved back to its file and copied to the clipboard — so a quick mark-up-and-send is just capture, scribble, close. If you only looked at a screenshot without changing it, closing just copies it to the clipboard and leaves the file as it was. Pressing
Esc closes the editor exactly like the close button, committing your work the same way.
Editable projects. Save a
.fwshot project to keep every mark separate and editable, then reopen it later to tweak an arrow or move a stamp rather than starting over.
Run it automatically with Watch and Process
Have every screenshot that lands in a folder checked and cleaned automatically:
Safe to Share reads the picture and hides email addresses, phone numbers, card numbers, ID numbers, IP addresses, web addresses and keys it finds — the same check as the editor's
Safe to share… button, without opening anything.
How to set it up:
1. Open
Watch and Process Automation, type a
Task Name and pick the
Watch Folder with
Browse… — the folder your files arrive in.
2. In
File Types type
*.png, *.jpg.
3. Click
Add FW Tool…, choose
Screenshot Recorder – Safe to Share and tick the kinds of details to hide, choose
Hide them with pixelate, blur or black boxes, and either
Replace the original picture or where to
Save the result. The line
What this step will do at the bottom of the window sums up your choices. Click
OK.
4. Click
Add Task, select the task and click
Start Watching. From now on every new file is handled within a few seconds, while the Watch and Process window is open (it can be minimised).
Example: Point the task at the folder your screenshots are saved in and save the results
In this folder Pictures\Safe to Share. A screenshot of a chat showing
sam.taylor@example.com and a card number gets a copy in Safe to Share with both pixelated — ready to post or send. Screenshots with nothing private in them are left alone and no copy is made.
Good to know: The details are found by reading the text in the picture, so very small, blurry or handwritten text may be missed — glance at the result before sharing anything important. Pixelate and blur use the same strength as the editor, strong enough that the text can't be read back. GIF, BMP, TIFF and WebP results are saved as PNG. Faces, signatures and other pictures aren't detected; use the editor's Blur / redact tool for those.