Image Converter - Convert and resize one image or a whole folder (Updated Nov 2026)
Description
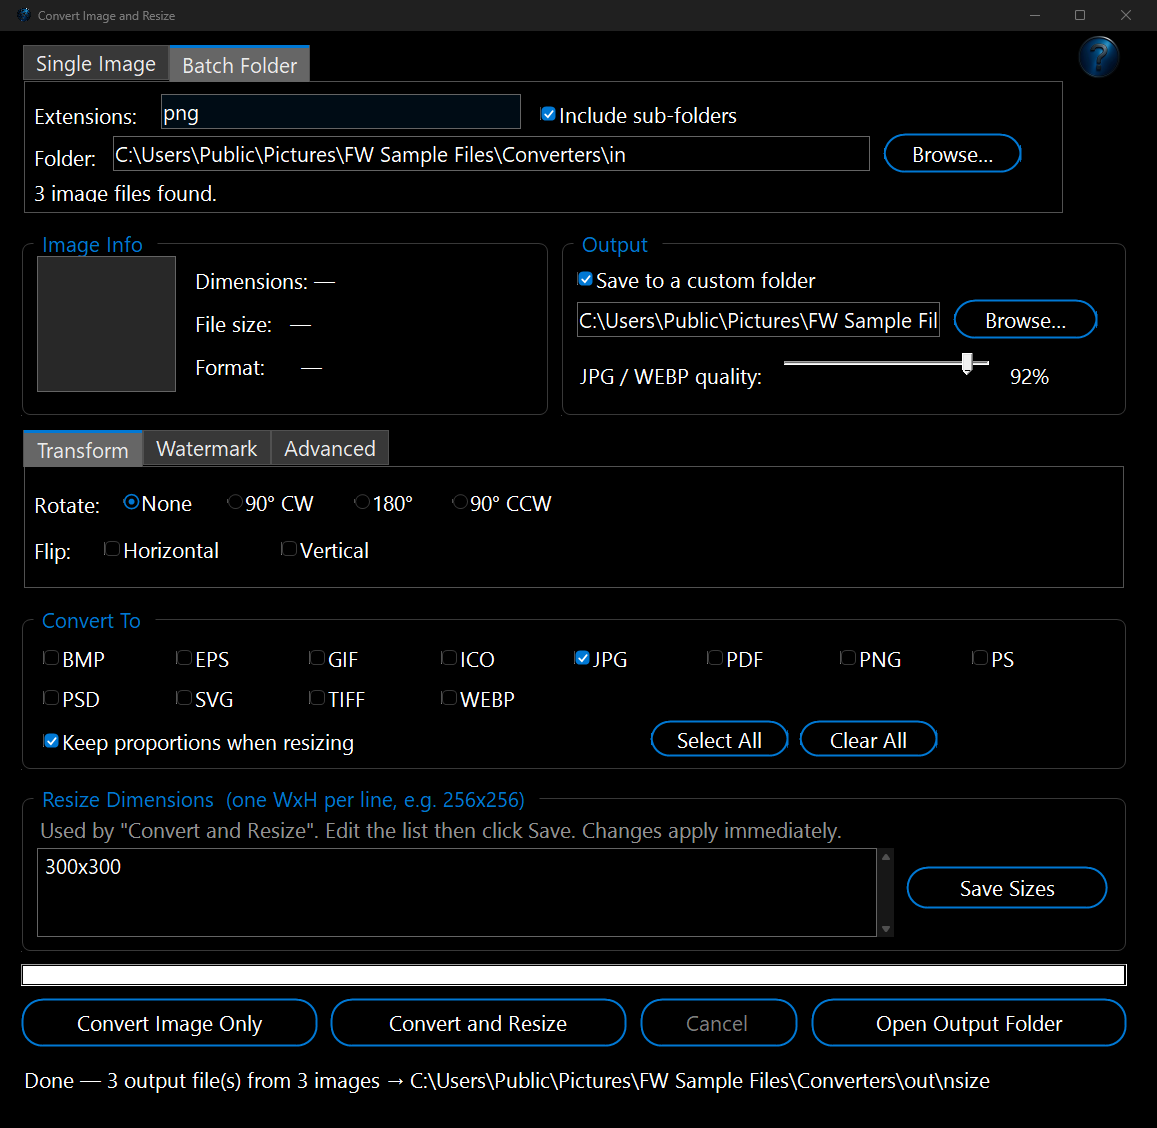
Image Converter converts images between formats and resizes them, either one image at a time or a whole folder in a batch. It reads a wide range of inputs (including JPG, PNG, GIF, BMP, TIFF, ICO, WEBP, AVIF, HEIC/HEIF, SVG, PSD, EMF and WMF) and can write to twelve output formats — ticking several at once to produce them all in one pass. You can create multiple target sizes from a single source, keep proportions while resizing, set the JPG/WEBP quality, and apply extra touches: rotate or flip, add a text watermark, strip EXIF metadata, and fill letterbox areas with a colour of your choice. Converted files are saved next to the original by default, or in a custom output folder.
How to use
1. Choose your input. On the
Single Image tab, click
Browse… (or drag an image onto the box) — the
Image Info panel shows its dimensions, size and format, with a preview. Or use the
Batch Folder tab to point at a folder, set which
Extensions to include (default
jpg,jpeg,png,gif,bmp,tiff,tif,webp), and tick
Include sub-folders if needed; a count shows how many images match.
2. Pick the output format(s). In
Convert To, tick one or more formats: BMP, EPS, GIF, ICO, JPG, PDF, PNG, PS, PSD, SVG, TIFF, WEBP. Use
Select All or
Clear All to set them quickly. Tick
Keep proportions when resizing if you want the aspect ratio preserved.
3. Set your resize sizes. In
Resize Dimensions, enter one
WidthxHeight per line (for example
16x16,
256x256,
250x100) and click
Save Sizes. Your list is remembered for next time. These sizes are used by
Convert and Resize.
4. (Optional) Choose output and quality. In
Output, leave files to save beside the source, or tick
Save to a custom folder and browse to one. Set the
JPG / WEBP quality with the slider.
5. (Optional) Add finishing touches. The settings tabs let you go further:
Transform to rotate (90° CW, 180°, 90° CCW) or flip horizontally/vertically;
Watermark to add text with a chosen position and font size; and
Advanced to
Strip EXIF / all metadata and to fill the letterbox background with a colour when keeping proportions.
6. Convert. Click
Convert Image Only to change format(s) without resizing, or
Convert and Resize to do both at once. A progress bar tracks the run — click
Cancel to stop, or
Open Output Folder when it’s done. Resized files are named like
photo-256x256.png so each size is easy to tell apart.

How it works and what to expect
Each picture, each size, each type: with two sizes and two types ticked, every picture gives four files, named like
photo-256x256.png. Several are made at the same time.
Phone photos are turned the right way up first.
Rotate and
Flip happen before resizing, so a turned picture still fits the size you chose.
Keep proportions fits each picture inside the size without squashing it; with
Fill letterbox background ticked, the picture is exactly the size and the gap is filled with the colour you chose.
Photo details: the date taken, camera details and colour profile are kept unless you tick
Strip EXIF / all metadata on the
Advanced tab.
Batch folders: pictures in sub-folders keep their sub-folder in your custom output folder, so two pictures with the same name don’t overwrite each other. A file that is replaced can be put back with the
Change Journal tool.
Problems: a picture that can’t be converted no longer stops the run — at the end, a list shows each one and why.
Example: the folder
Shop holds
mug.png and
Old\mug.png. With
JPG, size
300x300,
Keep proportions and a white letterbox, you get
mug-300x300.jpg and
Old\mug-300x300.jpg, both exactly 300 × 300 on white.
If something doesn’t work: HEIC, HEIF, EMF and WMF pictures can be opened but not saved, so they aren’t offered under
Convert To. PDF, EPS and PS files can’t be read (that needs Ghostscript, which isn’t included).
the file is damaged… — the file is broken or isn’t really a picture.