Image Type Converter - Change an image's file type without resizing it (Added Oct 2026) (Updated Nov 2026)
Description
Image Type Converter is a straight format converter — it changes an image from one file type to another (JPEG to PNG, PNG to WebP, HEIC to JPEG, and so on) without ever touching pixel dimensions, DPI or resolution. Where the other image tools resize or create multiple sizes of the same picture, this one does exactly one job: change the type, nothing else. Drop in one file, several, or a whole folder (with subfolders), tick one or more output formats, and convert the lot in a batch.
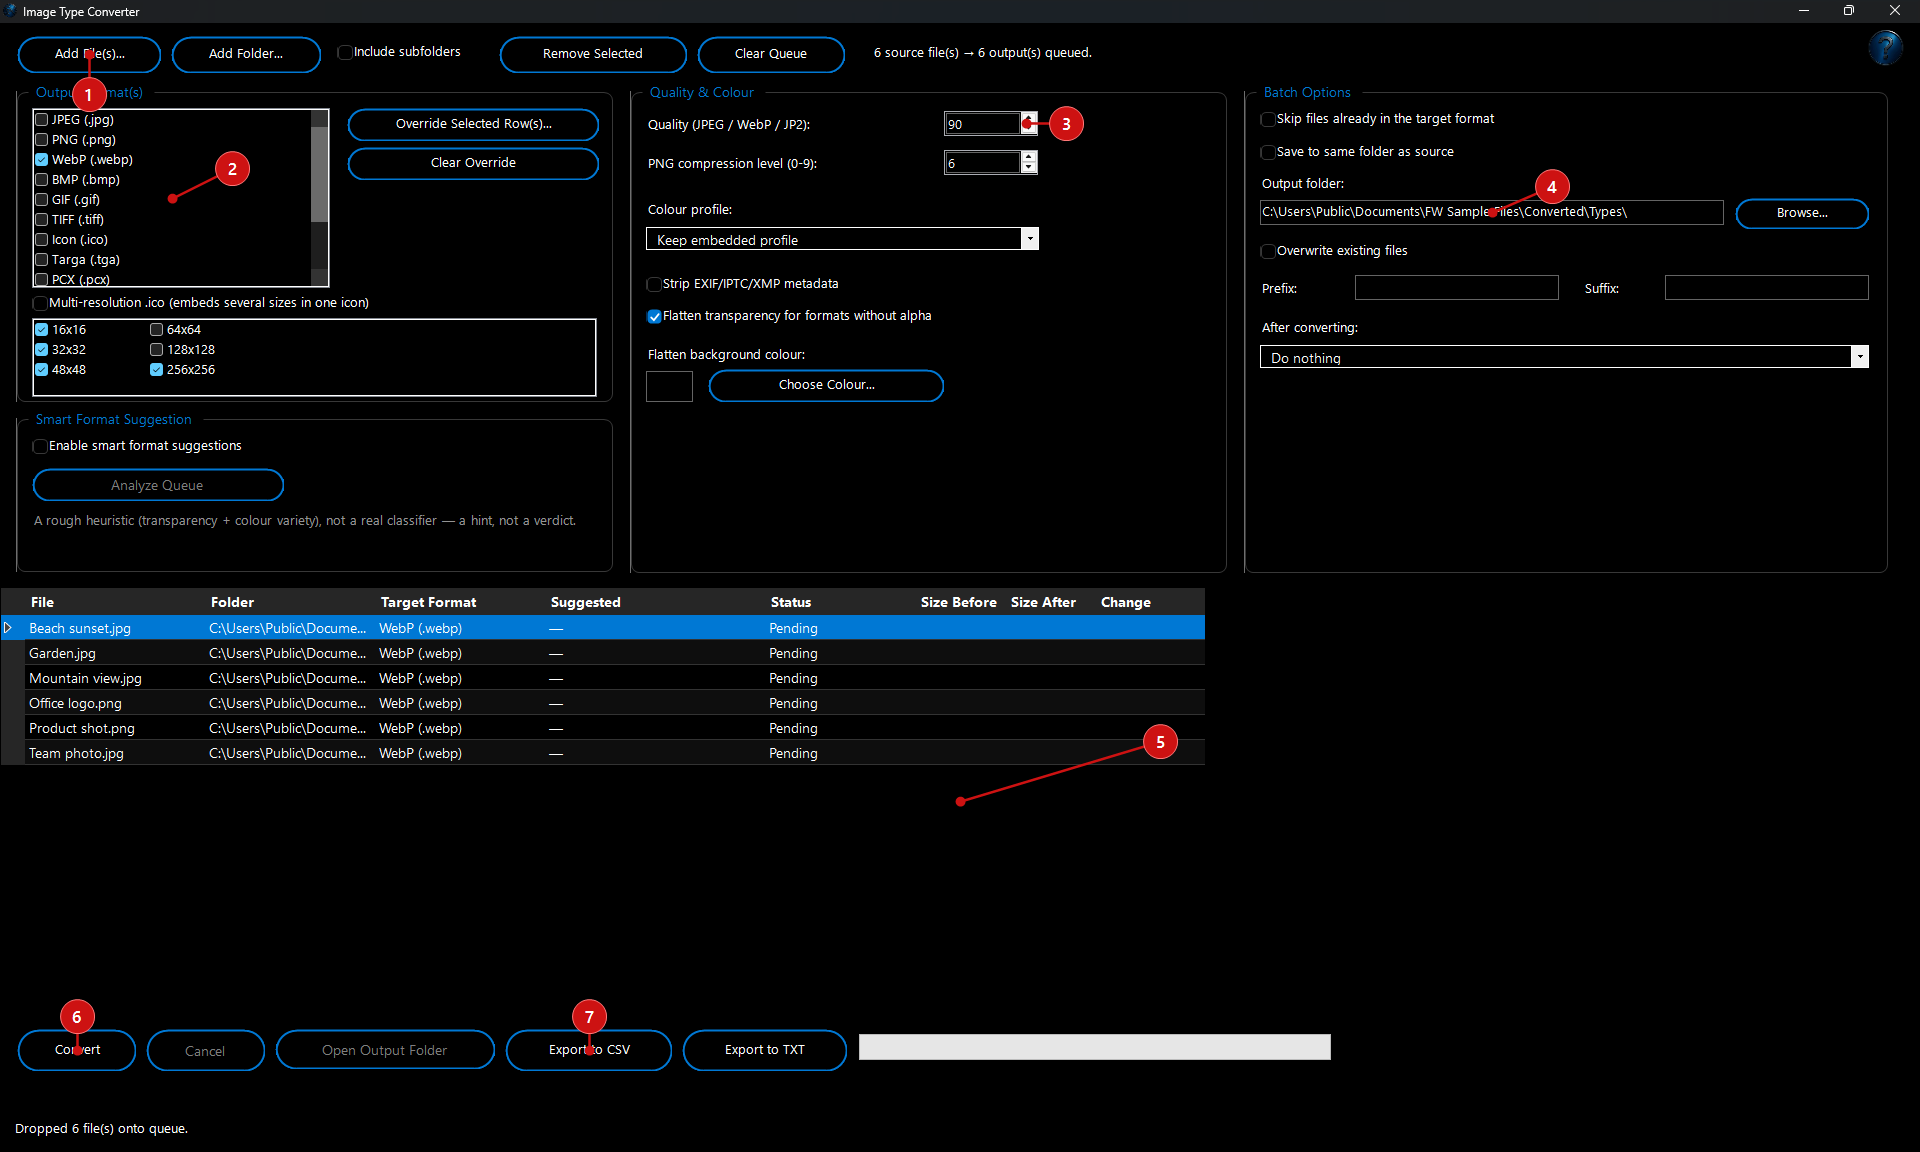
Adding files
Add File(s)... and
Add Folder... build a queue from individual files or an entire folder (tick
Include subfolders to pull in everything beneath it, mirrored into matching subfolders on output); you can also just drag and drop files or folders straight onto the queue. Reads a broad range of input formats — JPEG, PNG, BMP, GIF, WebP, TIFF, HEIC/HEIF, AVIF, ICO, Targa, PCX, PNM, JPEG 2000, PSD, DDS, SVG and common camera RAW formats (CR2, CR3, NEF, ARW, DNG, ORF, RAF, RW2 and more).
Output Format(s)
Tick any combination of JPEG, PNG, WebP, BMP, GIF, TIFF, Icon, Targa, PCX, PNM, JPEG 2000 and PDF — tick more than one and every queued file is converted to every ticked format in the same pass (handy for producing a modern WebP plus a JPEG fallback in one go). Need one file to go somewhere different from the rest of the batch? Select its row(s) and use
Override Format(s) for Selected Row(s)... — everything else keeps using the format(s) ticked here.
- Multi-resolution .ico: when Icon is one of the ticked formats, optionally embed several sizes (16 to 256px) in the one .ico file — the standard way a favicon or app icon is built. This is the one deliberate exception to "never resizes": it only ever applies to the generated .ico container itself, never to any other output format or to your source file.
Quality & Colour
- Quality: a shared slider for JPEG, WebP and JPEG 2000 output.
- PNG compression level (0-9): PNG is lossless either way — this only trades encode time for file size.
- Colour profile: keep the embedded ICC profile as-is, strip it, or convert it to sRGB — useful when a scanned or CMYK source needs to land correctly in a web-ready format.
- Strip EXIF/IPTC/XMP metadata: independent of the colour-profile setting, for a privacy-conscious export.
- Flatten transparency: on by default — converting a transparent PNG/WebP/GIF to a format with no alpha channel (like JPEG) flattens it onto a background colour you choose, instead of producing a broken result.
Batch Options
Choose an output folder or save alongside each source file, overwrite or auto-rename on a collision, add a filename prefix and/or suffix, and pick what happens once the batch finishes — do nothing, open the output folder, move the source files into a "Converted" subfolder, or move them to the Recycle Bin (confirmed first) — only pictures that converted without a problem are moved. Tick
Skip files already in the target format to avoid pointlessly re-encoding anything that's already there.
Smart Format Suggestion
Enable it and click
Analyze Queue for a quick, honestly-labelled heuristic per file — not a real image classifier, just two fast signals: whether it has transparency (favours PNG/WebP over JPEG) and how much colour variety it has relative to its size (a flat graphic favours PNG; a photograph favours WebP). A hint to steer you, not a verdict.
Results & reporting
The same grid that shows your queue becomes the results report once you click
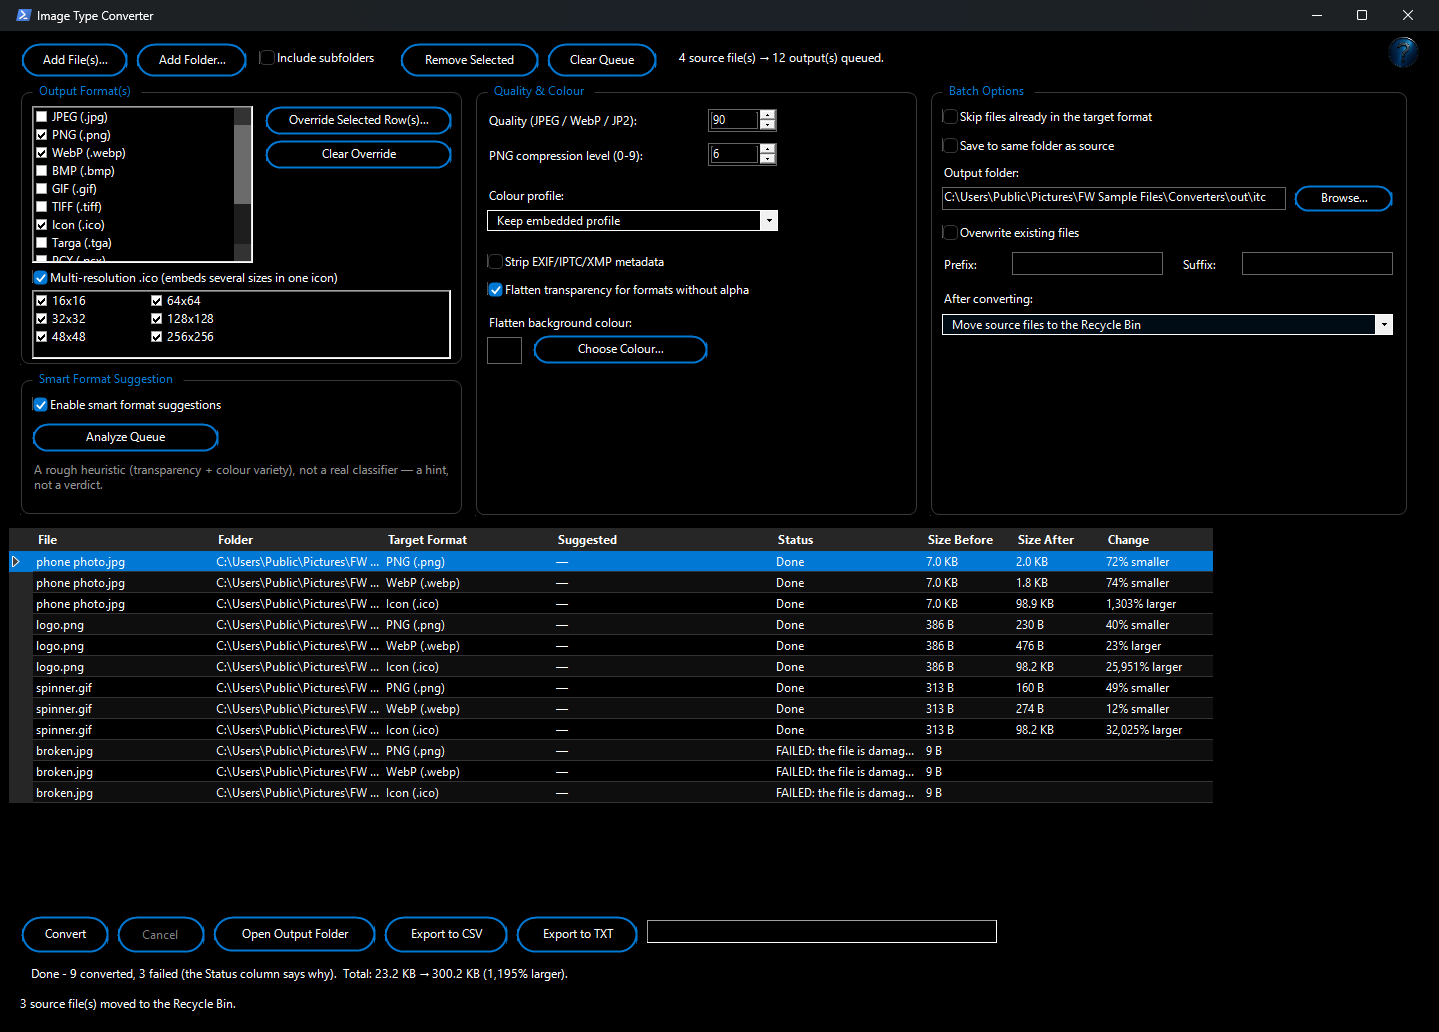
Convert — status, size before, size after and the percentage change per output, plus a batch total.
Export to CSV and
Export to TXT save that report for later, and
Open Output Folder jumps straight to what was produced.
What to expect
Phone photos are turned the right way up first, so a photo taken sideways doesn’t come out sideways.
Photo details: the date taken, camera details and colour profile are copied into the new file when the new type can hold them (JPG, PNG, WebP, AVIF, TIFF). Tick
Strip EXIF/IPTC/XMP metadata to leave the details out; the colour profile follows the
Colour profile choice, so colours stay right.
Moving pictures: an animated GIF stays animated when it becomes WebP or GIF; other types get its first frame.
Icons are made from the largest size in an .ico file. With
Multi-resolution .ico, each ticked size is a square holding the whole picture.
Speed: several pictures are converted at the same time. The
Status column fills in as each one finishes —
Done,
Skipped, or
FAILED with the reason in plain words.
Your originals: they are never changed.
After converting only touches pictures that converted without a problem:
Move source files to the Recycle Bin asks first, and you can get them back from the Recycle Bin or with the
Change Journal tool, which can also put back files that
Overwrite existing files replaced.
Example: you add a folder with three phone photos, a damaged download and an animated sticker, tick
PNG and
WebP, and choose
Move source files to the Recycle Bin. The photos come out upright with their dates, the sticker keeps moving as WebP, the damaged file says
FAILED: the file is damaged or isn’t really a picture of this type — and only the four pictures that worked go to the Recycle Bin.
If something doesn’t work: the file is damaged… — open it in Photos; if it doesn’t open there either, the file is broken.
PDF, EPS and PS files can’t be read here — those need a program called Ghostscript, which isn’t included.
the file is open in another program — close it and convert again.
Run it automatically with Watch and Process
Have every image that arrives in a folder converted for you, with the same settings as this window and without opening it.
How to set it up:
1. Open
Watch and Process Automation, type a
Task Name and pick the
Watch Folder with
Browse… — the folder your files arrive in.
2. In
File Types type the image types to convert, for example
*.webp, *.png.
3. Click
Add FW Tool…, choose
Image Type Converter and pick the type to
Convert to (JPEG, PNG, WebP, BMP, GIF, TIFF, Icon or PDF), the
Quality for JPEG and WebP (85 is a good balance), whether to
Remove hidden photo details such as where a photo was taken, and where to
Save the result. The line
What this step will do at the bottom of the window sums up your choices. Click
OK.
4. Click
Add Task, select the task and click
Start Watching. From now on every new file is handled within a few seconds, while the Watch and Process window is open (it can be minimised).
Example: WebP pictures you save from websites into
Downloads won't open in some older programs. A task watching
Downloads for
*.webp with this step set to
JPEG and
Next to the original file puts
recipe.jpg beside
recipe.webp a moment after you save it.
Good to know: The original image isn't changed. Images already in the chosen type are skipped (the log says "skipped - already JPEG"). Each image is converted once, and the new copies are never converted again. Transparent areas become white in types that can't be see-through (JPEG, BMP, PDF).
Or check each image first: if you'd rather see images before they are converted, a Watch and Process task can open them in this window instead. Use
Add Program, pick FW Admin Tech Tools Pro itself and give it the options
--converttype "{FilePath}"; each file that arrives lands in Image Type Converter's queue, ready for a one-click Convert.