Image Editor - A full layered photo editor built in — edit, adjust, filter, redact and annotate, right from Explorer (Updated Oct 2026)
Description
Image Editor is a complete, layered raster image editor built into FW Admin Tech Tools Pro — not just a quick resizer. Open almost any image format, including RAW camera files and even PDF pages, and work with real layers, selections and painting tools, full colour adjustments and creative filters, and precise transforms. It also shares the same rich annotation toolset as PDF Easy and Screenshot Recorder — arrows, text, stamps, blur/redaction, spotlight and more — so marks stay fully editable until you flatten or save. Right-click an image file in Windows Explorer and choose
Open with Image Editor to jump straight in, no need to open the app first — it is also listed by name, with its own icon, in Windows'
Open with list. It opens quickly and stays smooth on large photos, and you can drag the dividers beside the tool list and the side panel to size them the way you like; the editor remembers your layout (
Show > Reset panel sizes puts it back).
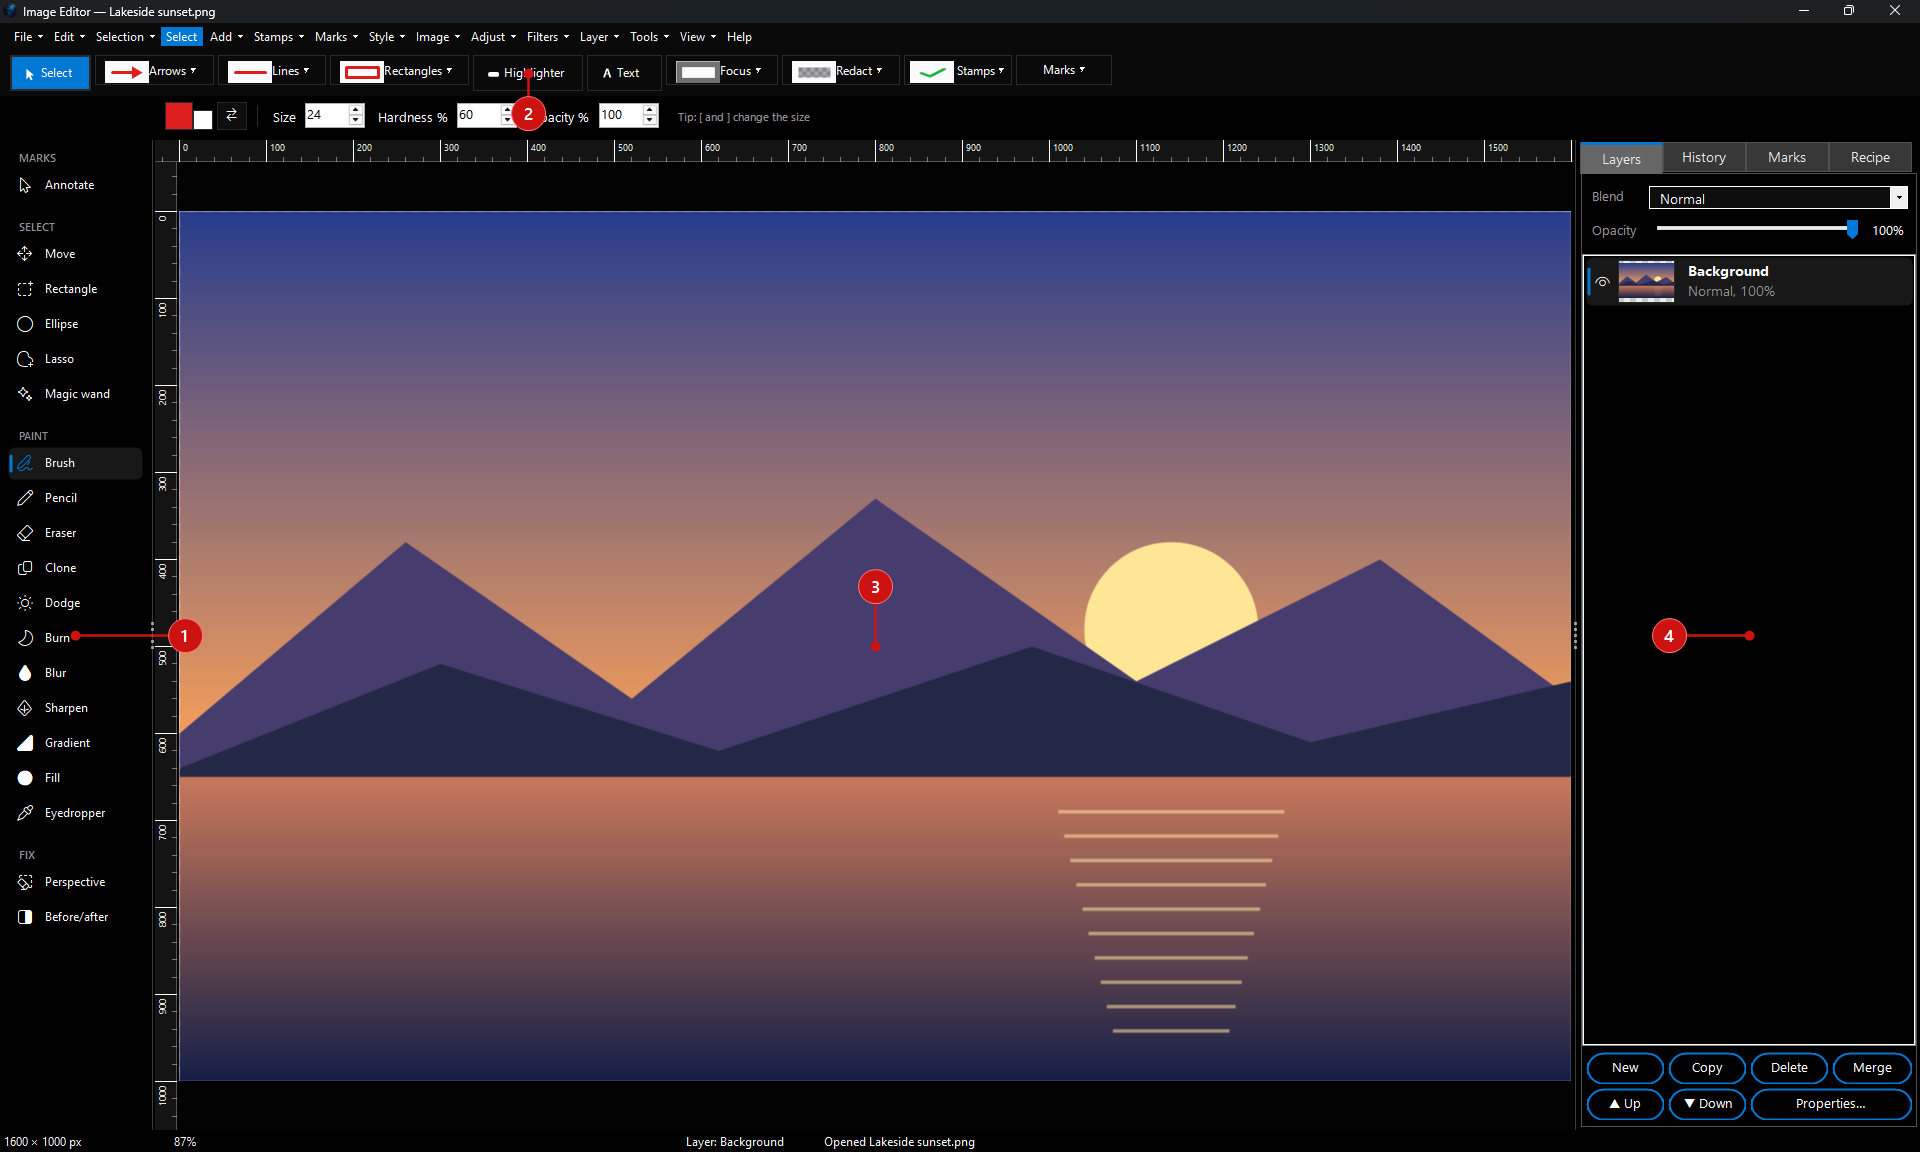 1. Tool palette
— selection, painting and fix tools for pixels, each with its own icon and grouped under Marks, Select, Paint and Fix; the tool in use is marked with a coloured bar.
2. Marks toolbar — arrows, lines, boxes, highlighter, text, stamps and blur/redact marks that stay editable; the options bar underneath changes with the tool.
3. The image, with rulers.
4. Side panel — Layers (blend mode, opacity, new, copy, delete, merge, order), History, Marks and Recipe.
Opening and saving
Open almost anything — PNG, JPEG, GIF, BMP, TIFF, WebP, AVIF, HEIC/HEIF, JPEG XL, ICO, PSD, TGA, DDS, SVG, EMF/WMF, JPEG 2000, QOI, OpenEXR, RAW camera files (CR2, CR3, NEF, ARW, DNG, ORF, RW2, RAF and more), and individual PDF pages.
Save to PNG, JPEG, WebP, AVIF, JPEG XL, TIFF, PSD, GIF, BMP, a multi-size ICO, PDF, JPEG 2000, TGA, DDS, QOI, OpenEXR or PPM, with a live file-size estimate as you adjust quality, lossless and progressive settings. The editor's own
.fwimg project format keeps every layer and mark fully editable between sessions; saving as PSD or TIFF also carries your layers across into those formats.
Layers and pixel tools
Build up an edit in real layers — add, duplicate, delete, reorder and merge them, set per-layer opacity and 13 blend modes, toggle visibility, lock a layer, or paste/import something straight in as a new one.
- Selection: Rectangle, ellipse, lasso and magic wand selection tools.
- Painting: Brush, pencil, eraser, clone stamp (Alt+click to set the source), dodge, burn, blur/sharpen, gradient, fill and an eyedropper for picking colours straight off the image.
Adjust and filters
Every adjustment and filter previews live before you commit.
- Adjust: Auto-enhance, brightness/contrast, levels, curves, exposure, hue/saturation, vibrance, temperature/tint, colour balance, gamma, local contrast, auto levels, auto white balance, equalize, greyscale, sepia, invert, posterize and threshold.
- Filters: Gaussian, motion and radial blur, tilt-shift, sharpen, reduce noise, despeckle, add noise, vignette, soft glow, pixelate, oil paint, painterly, pencil sketch, charcoal, emboss, edge detect, solarize, swirl and wave.
Transform
- Resize: by percentage, exact pixels, print size or fit-within, with a choice of 6 resampling algorithms.
- Canvas size: grow or shrink the canvas from any of 9 anchor points.
- Rotate, flip and straighten: any angle or a quick 90°, plus a straighten tool for a tilted horizon.
- Perspective fix: drag the four corners of a photographed document or whiteboard to flatten it square.
- Trim and crop: trim empty borders automatically, or crop freehand.
Mark up and redact
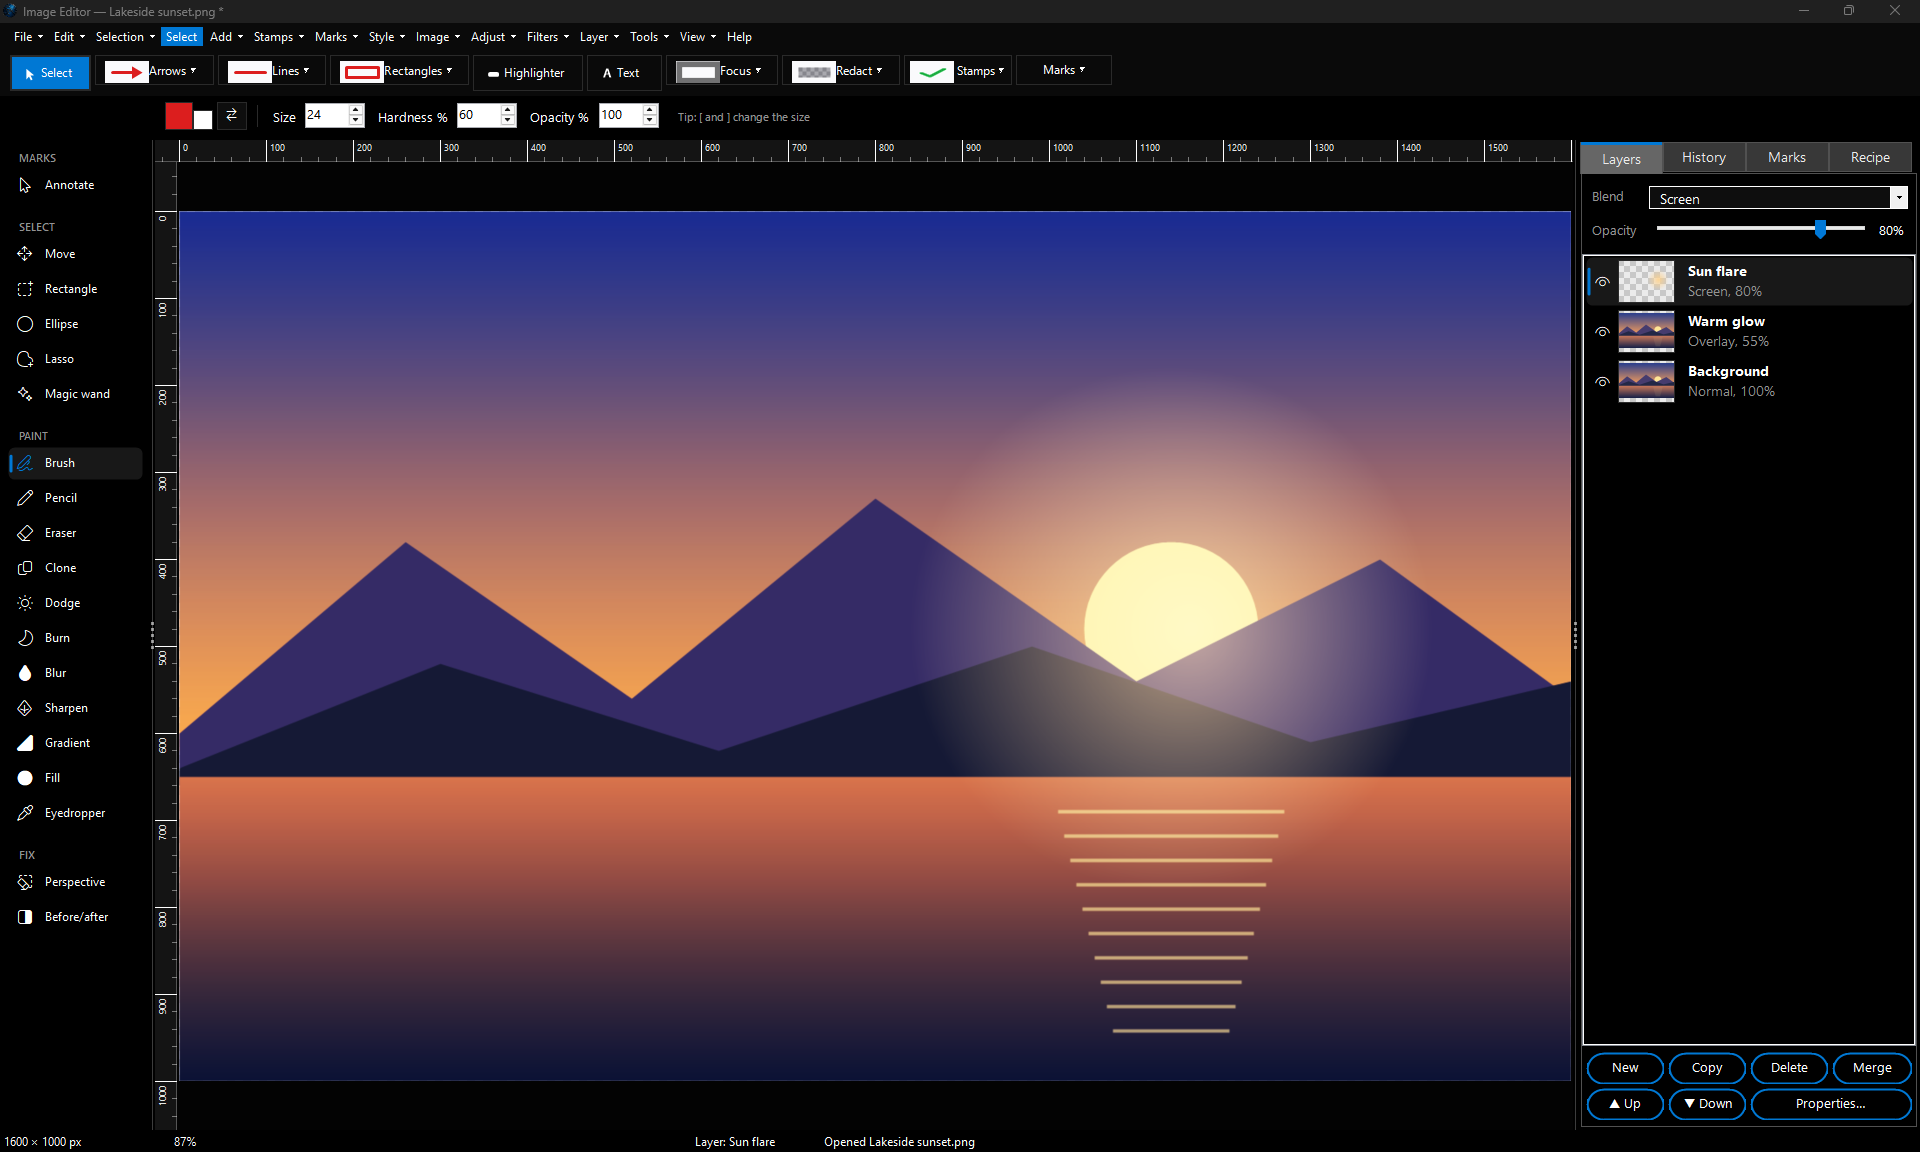
Marks can be dragged to move them, or by a corner handle to resize them, while any marking tool is still picked — no need to switch to Select first (the pen and highlighter keep drawing over other marks). Image Editor plugs into the same full annotation engine as PDF Easy and Screenshot Recorder — arrows, lines and shapes, a speech-bubble callout, highlighter and freehand pen, styled text with its own outline/halo option, auto-numbered steps, stamps and watermarks, a magnifier, and blur, pixelate or a solid black bar plus a dimming spotlight for hiding or drawing attention to part of an image. Every mark stays a separate, editable object until you choose to flatten it in. Over text, pixelate and blur always use a strength that leaves nothing readable, and a picture saved with them is written as one layer (even as PSD or TIFF), so the original can't be recovered from the file.
Batch and automation
Record a set of edits as a
Recipe, then replay it over every image in a folder (and its subfolders) in one pass — resize, format-convert and strip metadata together, instead of doing each image by hand.
Icon and asset pack generator
Turn one source image into a complete icon set in one go: a Windows
.ico, a full favicon set with the web manifest, the complete MSIX/Microsoft Store icon set, Android and iOS app icons, and common social media image sizes.
Privacy, accessibility and document tools
- Privacy check: scans for GPS coordinates, camera serial numbers, owner names and a hidden embedded thumbnail that doesn't match the edited image, with an exportable report.
- Export to a target file size: tell it the size you need and it works out the right quality/compression, instead of guessing by trial and error.
- Accessibility checker: simulates common forms of colour blindness, checks WCAG contrast, and extracts the image's colour palette.
- QR code and barcode finder: locates any QR codes or barcodes in an image so you can redact them before sharing.
- Document clean-up: gives a phone photo of a page that clean, flat "scanned" look.
- Before/after compare slider and crash-safe autosave recovery round it out.
Run it automatically with Watch and Process
Have the same edits made to every picture that arrives in a folder automatically: a ready-made set (auto-enhance, clean up document photos, black and white, old-photo sepia) or a recipe you recorded and saved in Image Editor.
How to set it up:
1. Open
Watch and Process Automation, type a
Task Name and pick the
Watch Folder with
Browse… — the folder your files arrive in.
2. In
File Types type the picture types, for example
*.jpg, *.jpeg, *.png.
3. Click
Add FW Tool…, choose
Image Editor – Apply a recipe and choose the
Edits to apply — one of the ready-made sets, or
A recipe I saved in Image Editor and pick the
Recipe file — then
Save as,
Quality, what to do with
Photo details, and either
Replace the original image or where to
Save the result. The line
What this step will do at the bottom of the window sums up your choices. Click
OK.
4. Click
Add Task, select the task and click
Start Watching. From now on every new file is handled within a few seconds, while the Watch and Process window is open (it can be minimised).
Example: To make your own recipe: open a photo in Image Editor, open
Recipe & batch… (in the Tools group), make your edits (for example brightness, a vignette and a border), then click
Save recipe… and save it as
Holiday look.fwrecipe. Choose that file in the step, and every photo saved into
Pictures\To Edit gets exactly the same edits in
Pictures\Edited. For receipts or letters photographed with your phone, the ready-made
Clean up document photos straightens them, removes shadows and sharpens the text.
Good to know: The original is only changed if you tick
Replace the original image. When the result goes into the same folder, "(edited)" is added to its name.
Keep the safe ones keeps the date and camera but removes the location and serial numbers. iPhone HEIC photos are saved as JPEG. If a recipe file is moved or deleted, the step says so in the Activity Log.