FW Admin Tech Tools Pro


|
PDF Easy - A complete PDF workshop: organise, edit, convert to Word or Excel, redact, sign, check signatures, compress, number pages, bookmark, flatten, protect, compare, annotate and OCR (Updated Nov 2026)
Only need this one tool? It’s also sold on its own as FW PDF Easy in the Microsoft Store — a one-time purchase with no subscription and no in-app purchases.
Description
PDF Easy is an all-in-one workshop for PDF documents. Open one or several at once in tabs, then reach for whichever tool you need: reorganise pages, edit text on the page, permanently redact sensitive details, sign, protect, archive, number, compare, mark up and more — all in one window. Each tool opens on the page you're viewing and returns you there when it's done.
The big idea is that your changes are held in memory as you work, with full undo / redo, and nothing is written to disk until you choose Save or Save As. That means you can stack up edits — redact a few names, add a watermark, drop in a signature, number the pages — and only commit them when you're happy, with a prompt to save on the way out if you forget.
Under the hood PDF Easy is built on a professional PDF engine (Syncfusion Essential PDF, used under its Community licence), so redaction really strips the content, signatures are genuine, and the pages you save are proper, standards-friendly PDFs.
Before you start — requirements
Nothing extra is needed for the core tools. Opening, editing, redacting, protecting and saving all work out of the box.
Run as administrator. As with the rest of FW Admin Tech Tools Pro, run the app as administrator, and save into a folder your account can write to.
Inline preview. Pages are shown with an embedded viewer; on a build without it the tools still work — you open a file, act on it, and save — you just don't get the live page preview.
OCR language data (optional). Making a scanned PDF searchable needs a tessdata folder (with eng.traineddata) alongside the app, which ships with the tool.
Where your presets live. Saved redaction and mark presets, your signature library and your preferences are stored under %LOCALAPPDATA%\FWAdminTechToolsPro\TechTools — tied to the product rather than the version, so they're kept when you update the app.
The main window
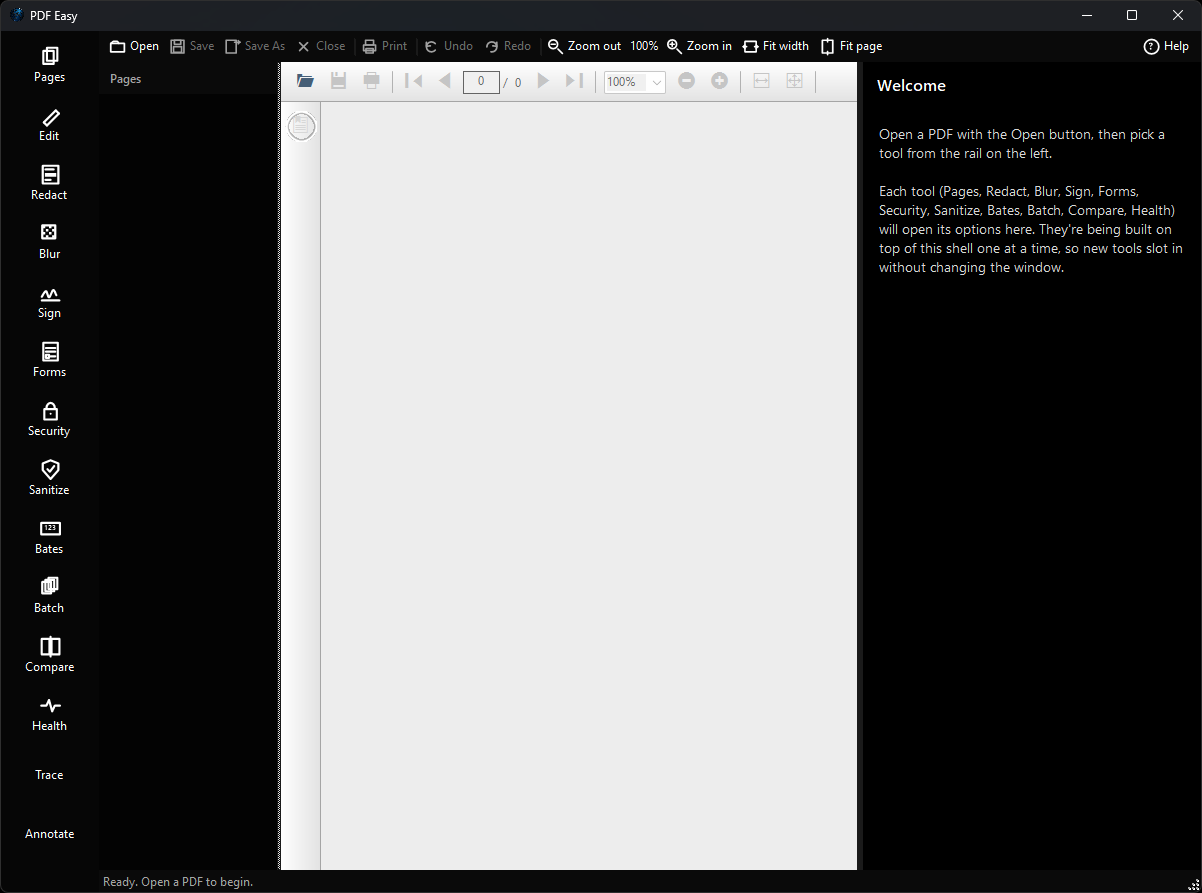
The window has four parts. The tabs along the top hold each open document. The tool rail down the left switches between tools, each of which opens its own options panel on the right. A strip of page thumbnails lets you jump around and pick pages, and the page preview in the middle shows the current page, centered. A top command bar handles Open, Save, Print, Undo / Redo and zoom.
The all-in-one editor
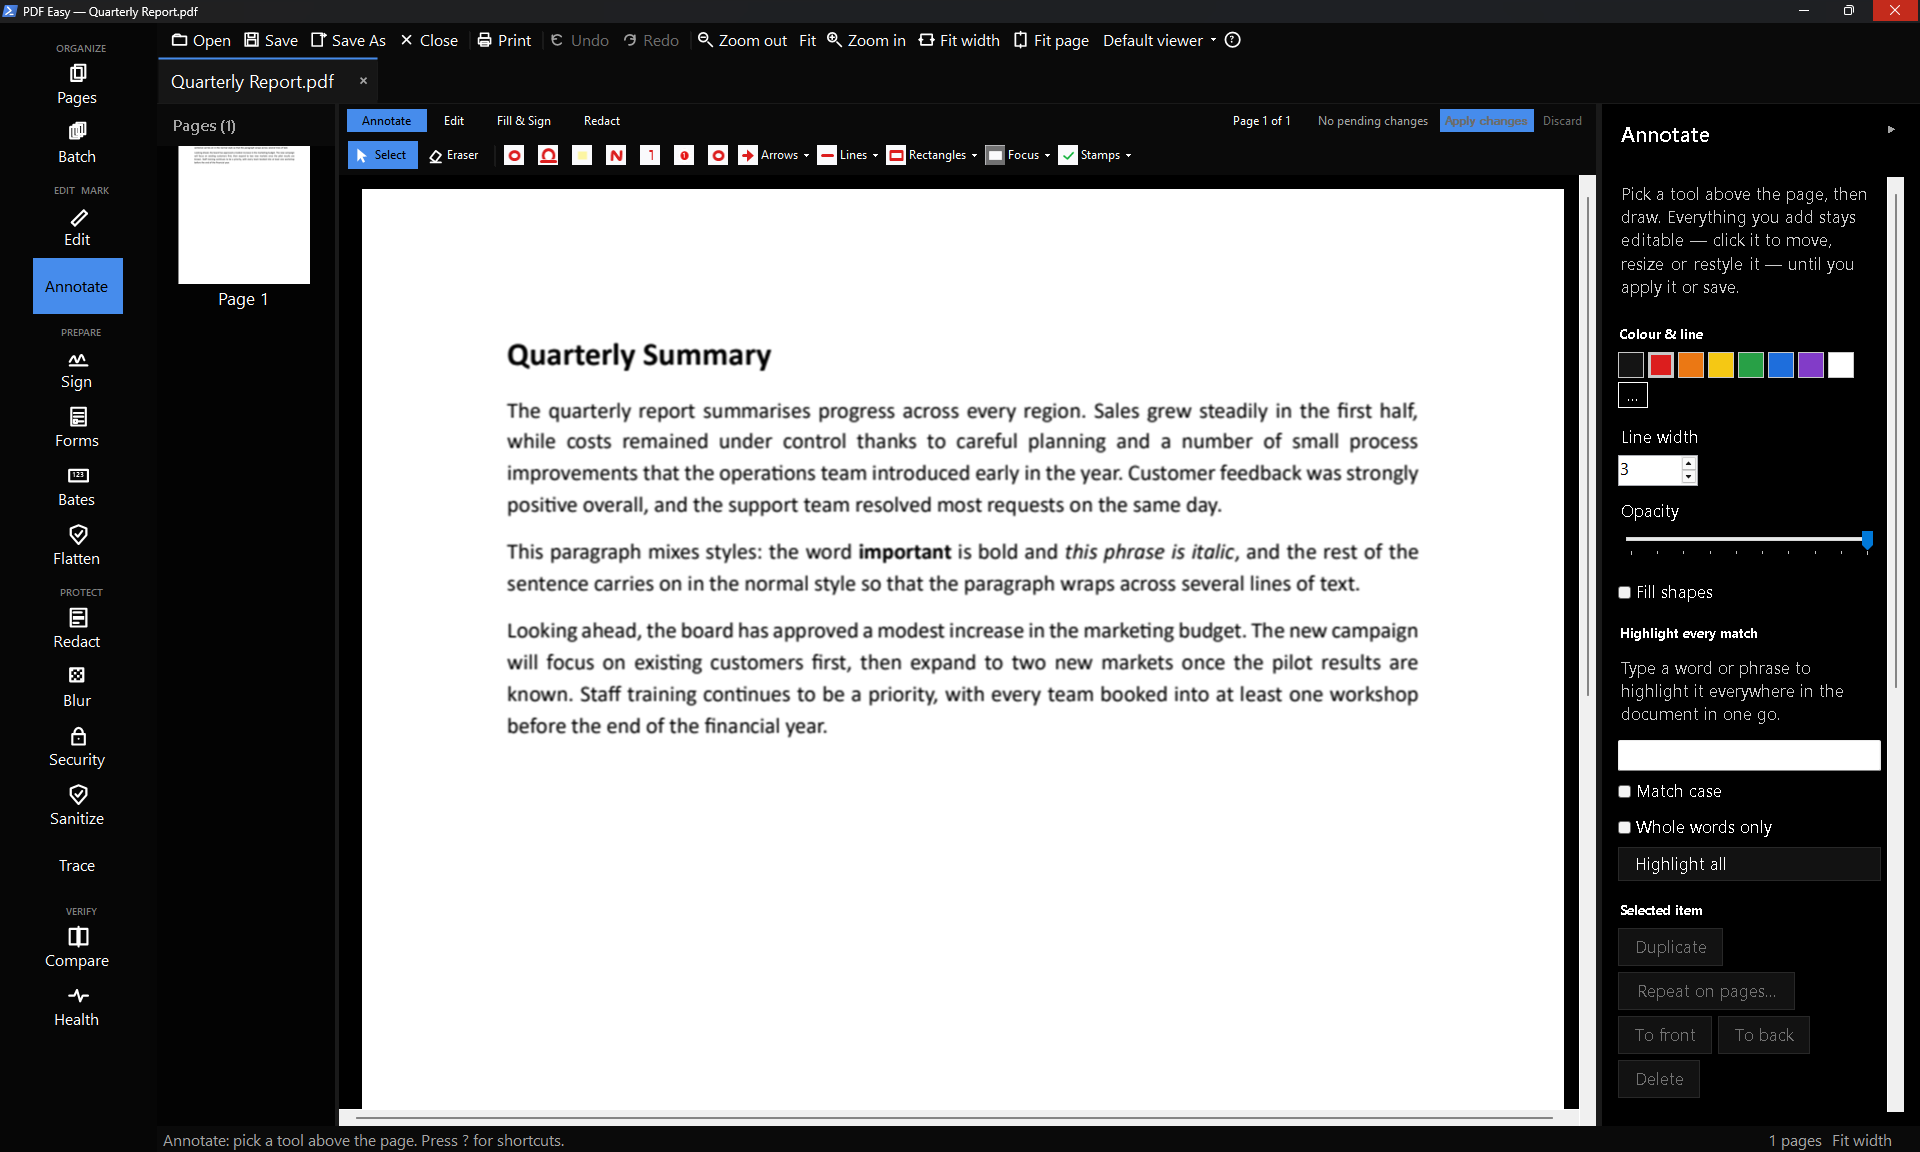
Annotating, editing, filling & signing and redacting all happen in one place: a smooth, continuously scrolling view of every page, right in the PDF Easy window. Pick Annotate, Edit, Fill & Sign or Redact along the top of the page (or from the tool rail) and the matching tools appear; everything you've already added stays on the page in every mode, so you can draw an arrow, fix a typo, sign and black out an account number in one sitting and see it all together. Every change stays live — click it to move, resize or restyle it, or press Delete — until you apply it, save, print or use another tool, and Undo works right across the document. Scrolling is smooth even on long documents: pages appear instantly and sharpen a moment later.
- Replace text: Drag across words that are already on the page and type the new wording. The old words are removed from the file, the cover matches the paper, and the new text comes out in the same size and colour as the original.
- Type straight onto the page: Click and type — the box grows as you go, and the result is real, searchable PDF text, not a picture.
- Smart whiteout: Covers automatically match the colour of the paper underneath, so a correction on cream or grey paper doesn't stand out.
- Fill & Sign: Your saved signatures and initials, today's date in the format you choose, and ticks, crosses, dots, circles and strike lines for flat forms that have no fields.
- Initial every page & sign the last — in one click: Your initials go on the bottom of every page and your signature on the last page, ready to nudge if you need to.
- Highlight every match / find & mark for redaction: Type a word or phrase and every occurrence in the document is highlighted, or marked for redaction so you can check each one before anything is removed.
- Repeat on pages: Copy any stamp, mark or signature to every page, odd or even pages, or a page range — and undo all the copies in one step.
- Changes list: Every change you haven't applied yet is listed by page; click one to jump straight to it, or apply or discard them all.
- Never lose your work: Unapplied changes are kept as a draft as you go. If PDF Easy closes before you've saved, open the same file and they're offered back — still editable.
- Keyboard shortcuts: One key per tool (press ? to see them all), plus copy and paste in place, duplicate, and arrow-key nudging.
Organising pages
The Pages tool is where you shape the document. Merge another PDF in, pull pages out, drop pages you don't want, rotate, reorder and split — then save the result.
- Add / merge: Append or insert the pages of another PDF.
- Remove & extract: Delete the selected pages, or pull them out into a new file.
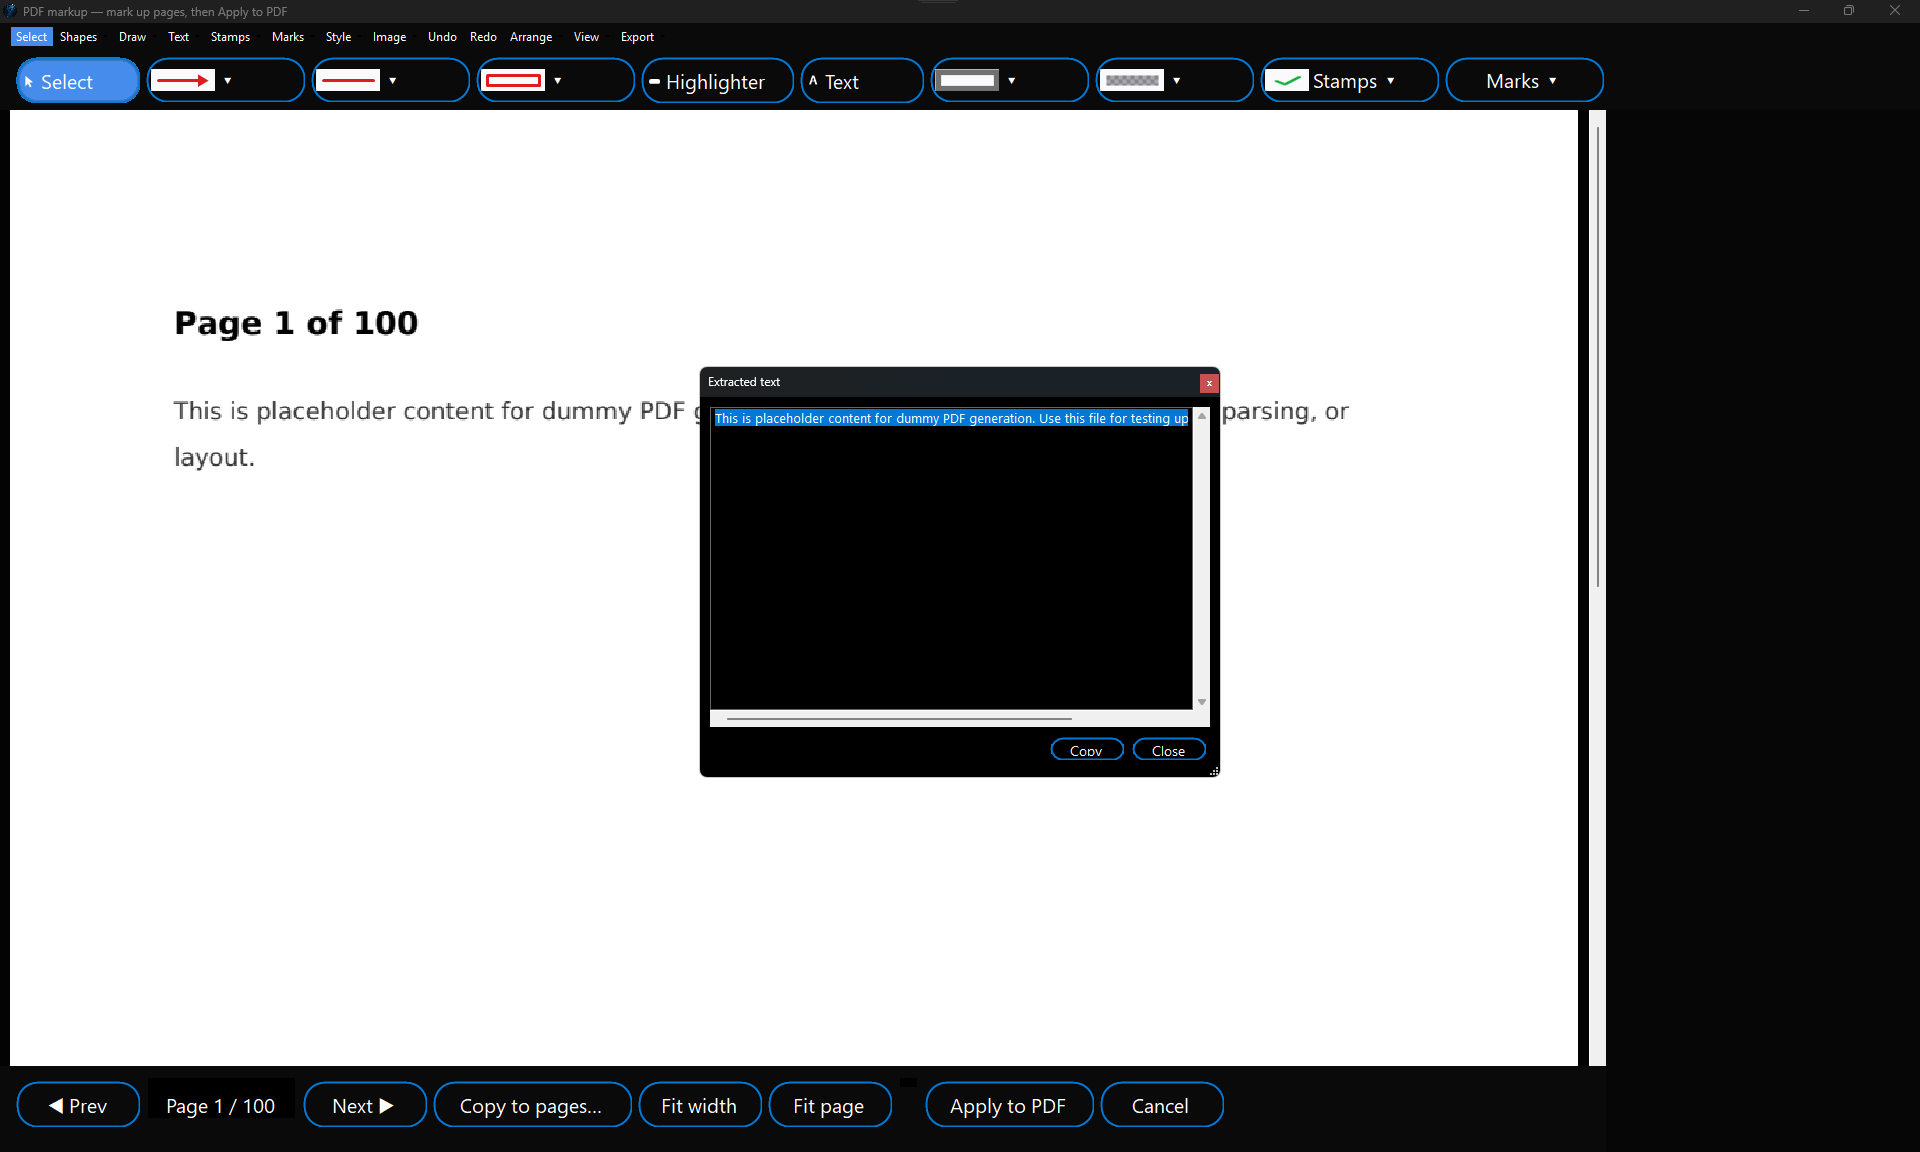
- Extract text: Save the text of all or the selected pages as a TXT or CSV file, or copy it, as tidy paragraphs in reading order. Words hidden under a blur or whiteout come out as [covered]. Scanned pages need Make scanned pages searchable (OCR) first.
- Rotate & reorder: Turn pages left or right and move them up or down into the order you want.
- Split: Break a big document into files of however many pages each.
Editing and find & replace
The Edit tool changes the words that are already in your PDF, puts new content on the page, and finds and replaces text across the document.
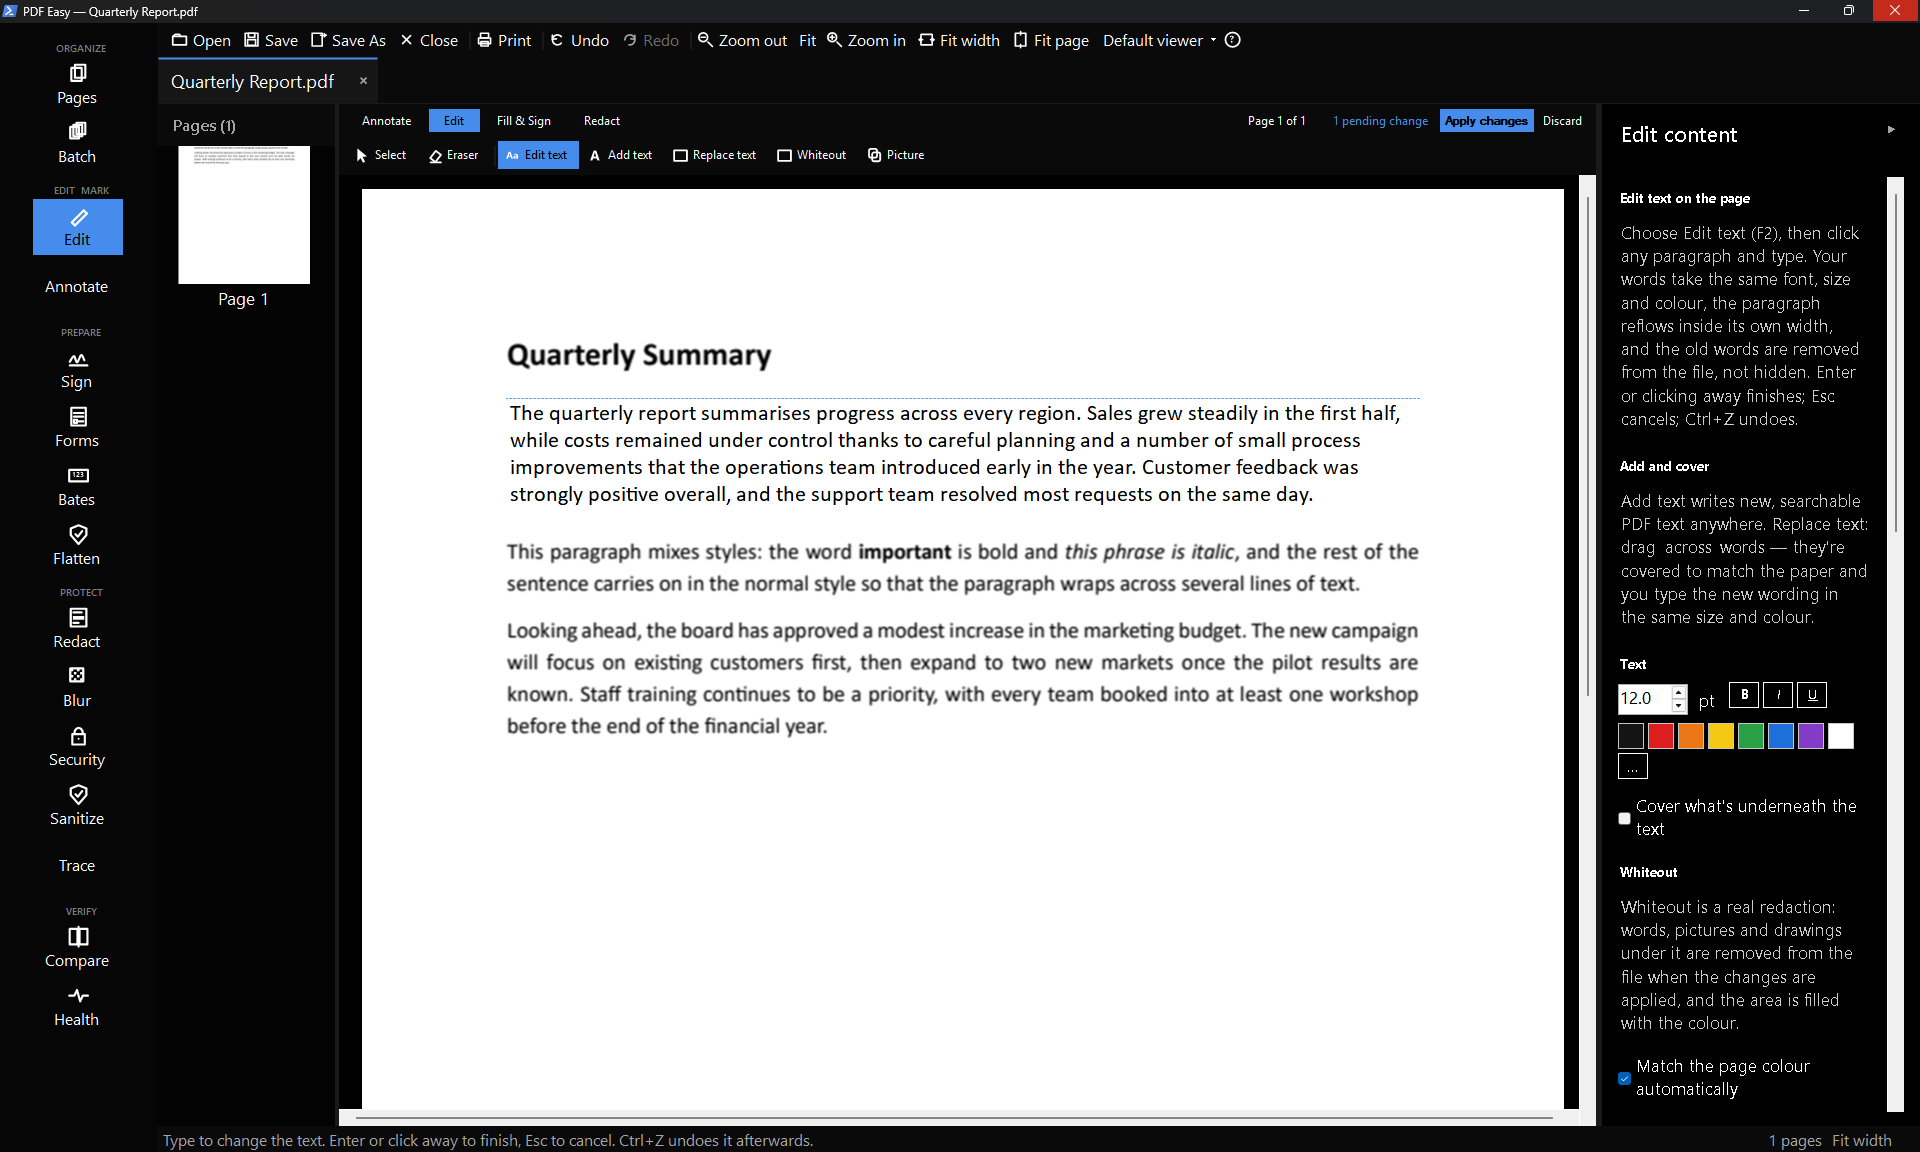
- Edit text on the page: Choose Edit text (or press F2), move the mouse over the page — the paragraph you'd edit is outlined — and click where you want to type. Add, delete or retype words as you would in a word processor. Press Enter or click away to finish, Esc to cancel, and Ctrl+Z to undo.
- Looks like it was always there: Your words use the same font, size, colour and line spacing as the text around them, bold and italic words keep their style, and the paragraph reflows inside its own width — left-aligned, centred, right-aligned and justified paragraphs all stay that way.
- The old words are really gone: When you apply the change, the original words are removed from the file — not hidden under a box — and the new words are real, selectable and searchable text.
- Never overlaps anything: If your new wording needs another line, it uses empty space below the paragraph. If something is in the way, PDF Easy offers to make that text slightly smaller so it fits, or you can keep editing.
- Fonts: If a paragraph uses a font that isn't installed on your PC, PDF Easy tells you before you start and suggests the closest match, or you can pick any installed font. If you type a character the font doesn't have, it tells you and offers a font that has it.
- Type on the page: Add new text where you want it, style it (bold, italic, underline, size and colour), and even make a single word bold within a sentence.
- Images and white-out: Drop in an image, or cover something with a filled box that matches the paper colour.
- Find & replace: Search the document (with match-case and whole-word), see how many matches there are, and replace them all. Each replacement is made the same way as Edit text: the old words are removed and the new ones written in the same font, size and colour. Before anything changes you're told how many matches will be replaced, which ones can't be and why.
Edit text — what it can't do
Edit text works on PDFs that contain real text, such as documents exported from Word, Google Docs or LibreOffice. It can't change scanned pages or words that are part of a picture — use Add text and Whiteout there. A paragraph that is partly under a blur, whiteout or other mark saved into the page is left as it is, so the covered words stay hidden; the other paragraphs on that page can still be edited. Next to a redaction box, a line that would get longer is only allowed to grow into empty space, never under the box. New wording is written in the matching font installed on your PC, because the copy of a font stored inside a PDF can't be used for new text; if that font isn't installed, the lines you change will be in the font you choose and may look slightly different. A paragraph reflows only inside its own width and into empty space directly below it: it never moves other content, never continues onto the next page and doesn't flow around pictures. Lists, table cells, headers and footers are edited one line at a time. Right-to-left text (such as Hebrew or Arabic), vertical or sideways text, and text on turned pages can't be edited yet, and you can't start a new paragraph inside an existing one. PDFs whose author has turned off editing can't be changed. Unusual letter spacing isn't copied to the lines you change, and some screen readers may read edited lines after the rest of the page.
Redact and blur
Redaction in PDF Easy is real — the underlying content is stripped, not just covered — so what you hide can't be recovered from the file. That applies to every redaction style, including Pixelate and Blur: the words are removed and can't be copied or searched, no earlier version of the page is kept inside the file, pictures under the box are cleared, comments and links inside the box are removed, and even the spacing of the removed letters is wiped. Pixelate and Blur are strong enough that nothing can be read, even over a single line, and a Strength choice in the Redact and Blur panels (Standard, Strong or Very strong) makes them coarser still. The same goes for Blur, Pixelate and Black bar marks in Annotate and for Whiteout: everything that hides part of a page is a real redaction. For PDFs marked up with earlier versions, Remove hidden text (Health & Privacy, also offered when you save) deletes words that were left under old blurs and whiteouts, without changing how the page looks.
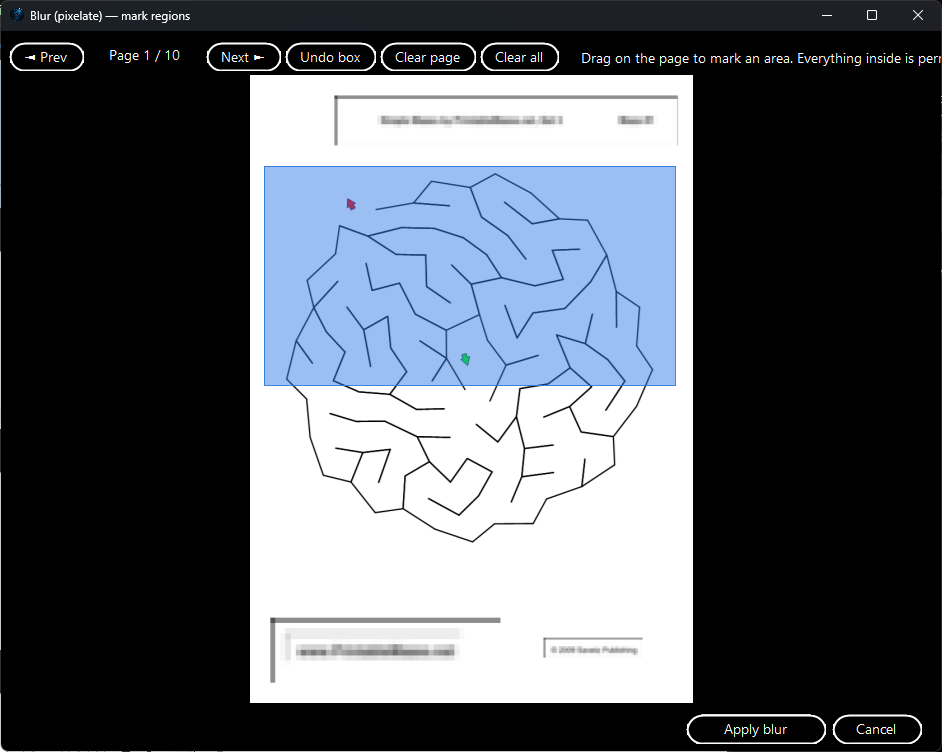
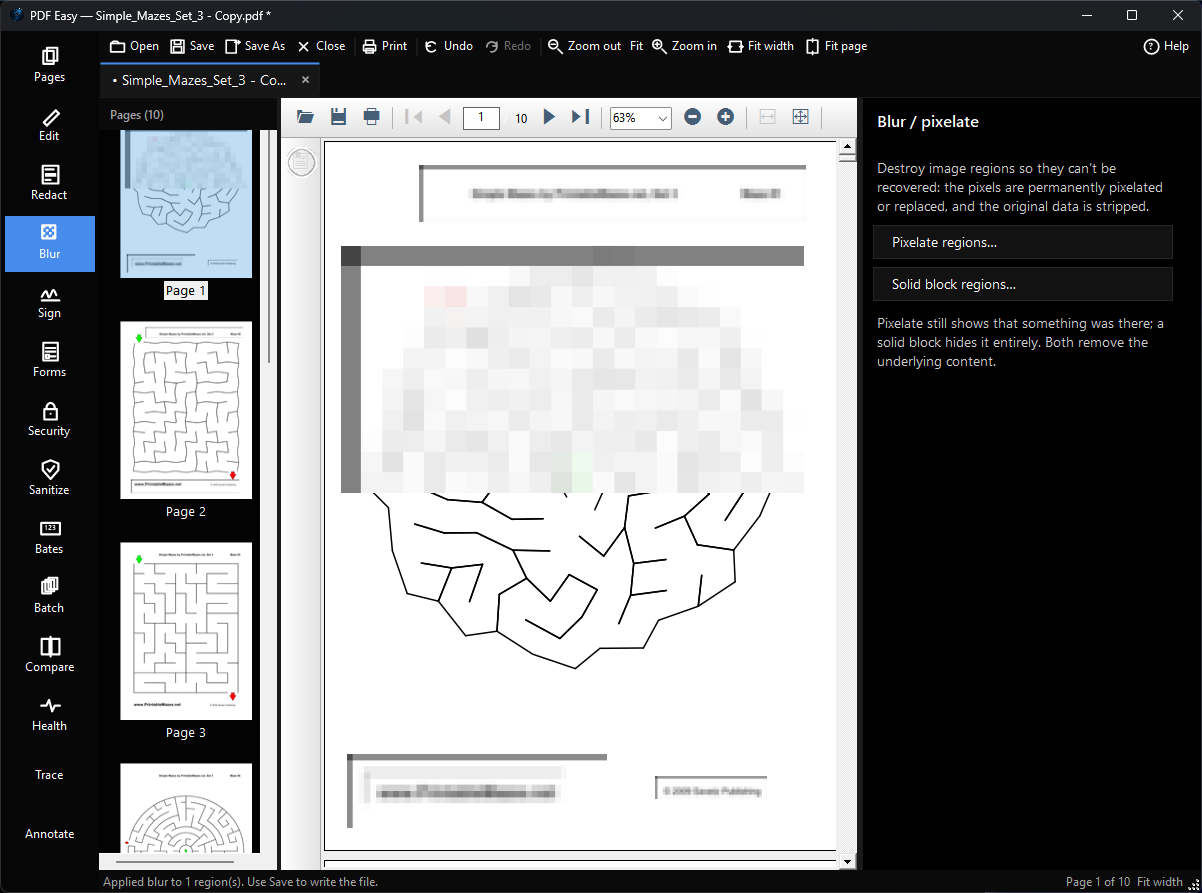
- Mark and redact: Draw boxes over the regions to remove, and apply — the content is permanently stripped and replaced with a solid block.
- Auto-redact by pattern: A searchable, worldwide pattern library finds things like emails, phone numbers, card numbers and national IDs for you. Mark the matches on the pages to check them one by one before anything is removed, or redact them all at once. Search it, tick what you want, build up a selection, and save it as a preset for the kinds of documents you handle every day.
- Pixelate, blur or a solid block — mixed freely in one pass: Where you'd rather soften than black out, a mode picker in the marking dialog lets you choose Redact, Pixelate, a genuine soft Blur, or a Solid block for each region as you draw it, so a single marking session can mix and match exactly the treatment each region needs instead of running it separately for every kind. Each box shows a live preview of the actual effect — not a placeholder — while you're still marking, so you see exactly what you'll get before you apply.
Sign and forms
Sign on screen or with a certificate, and fill in interactive forms.
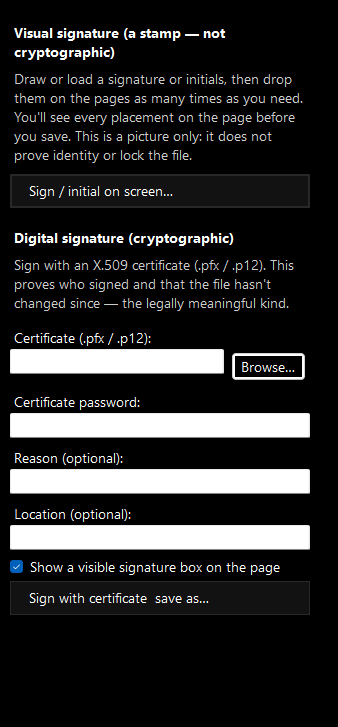

- Sign on screen: Draw your signature or drop in an image of it, place it on the page, and sign more than once before you save. Save up to 30 signatures to a quick-pick library that survives app updates.
- Drag your signature onto the page (as in Adobe Acrobat and Nitro Pro):
1. Click Sign on the tool rail (Fill & Sign).
2. Under My signatures, press on your signature and, keeping the mouse button down, drag it onto the page. A see-through copy of it follows the pointer, at the size it will be.
3. Let go over the place it should go, such as the signature line. It lands centred where you let go, already selected: drag it to move it, or drag a corner to make it bigger or smaller.
4. Click Apply changes (or Save) to put it into the file.
Example: a lease arrives as Lease - 12 River St.pdf. Open it, click Sign, drag your saved signature onto the tenant’s signature line on the last page, drag the Date tool next to it, and save.
Good to know: a signature lands 150 pt (about 5 cm) wide; one with “initial” in its name lands at initials size (70 pt). Undo takes it back. Choosing a signature and clicking on the page, or double-clicking it in the list, still works too. Dropping a PDF file onto the window still opens it.
- Certificate signature: Apply a genuine cryptographic signature with an X.509 certificate, so a recipient can verify who signed and that the file hasn't changed since. You can check the signatures in a PDF you receive too — see Check signatures below.
- Forms: Fill in a PDF's form fields and, if you like, flatten them so the values are locked into the page. A form field is a box in the PDF that you can type into or tick, such as one you added with Add or edit form fields below, or one already in a form you were sent.
Fill in a form by clicking it:
1. Open the PDF. You don't need to pick a tool first.
2. Point at a box on the page. If it is a form field, the bar at the bottom of the window says Click to fill in and the field's name.
3. Click the box. The Forms tool opens on that page with the boxes highlighted in yellow, and the one you clicked is ready: a text box has the cursor in it, a checkbox is ticked (click again to untick it), and a dropdown opens its list.
4. Fill in the other boxes, then click Save (or Apply to document now to see your entries on the page first).
Example: you open Order form.pdf, click the empty Contact name box and type Jordan Smith, click the Paid checkbox to tick it, pick Courier from the Delivery list, then click Save. The file now holds your entries and stays a fillable form, so you can click a box again later to change it.
Good to know: your entries go into the file when you save. Switching to another tool keeps them in the open document until then, and Undo takes them back. Clicking a field works in the normal page view; while Edit, Annotate, Fill & Sign, Redact or Blur is open, pick Forms on the tool rail instead.
If something doesn't work: if nothing happens when you click, the box is probably just printed on the page and isn't a real form field. Use Fill & Sign to type or tick on top of it, or add a field with Add or edit form fields. If the bar says a field is read-only, whoever made the form locked it. A signature box is signed with Fill & Sign or a certificate signature, not typed into.
- Add or edit form fields: Build a form from scratch or add to one that already has fields, right on the page. Drag out a text box, checkbox, dropdown, list box, radio group or signature field wherever you want it, typing in the choices for dropdowns, list boxes and radio groups as you place them. Afterwards, click any field — new or already in the document — to move it, resize it with on-page handles, or delete it; a radio group's options move and resize together as one.

Flatten
The Flatten tool bakes interactive form fields and annotations — comments, stamps, markup and signatures — into the page as fixed content, so they can no longer be moved, edited or removed and the file renders the same in every viewer. It's also a quick way to “repair” an awkward or very large PDF: re-writing the pages often produces a lighter file that opens and previews more cleanly — including in the markup editor.
- Flatten now: Flatten the open document in place. The change is held in memory with full undo, and nothing is written to disk until you Save.
- Flatten to a new file: Leave the open document untouched and write a flattened copy to a new file.
Protect, sanitise and archive
- Encrypt: Lock a copy with AES-256, with an open password and permissions for printing, copying, editing and annotating.
- Scrub metadata & sanitise: Strip hidden document data (author, title, keywords and XMP), and optionally flatten forms and annotations, before sending a file out.
- Convert to PDF/A: Save an archival, self-contained copy with fonts embedded, at a conformance level of your choice.
Bates numbering and batch
- Bates numbering: Stamp sequential numbers (e.g. ABC-000001) onto every page, with your own prefix, padding, position and colour.
- Batch: Apply one operation — Bates numbering, a watermark, a metadata scrub, a flatten, encryption, Compress (make smaller), Make searchable (OCR) or Headers, footers & page numbers — across a whole list of files at once, with the Bates counter carrying on across the set. Pick the operation under Operation, set its options, click Choose files & run…, choose the PDFs and then the folder for the results. Your files are never changed: each result is a new file in that folder with a word added to its name, such as Report (Smaller).pdf or Scan (Searchable).pdf. When it finishes, a list shows each file with OK or FAIL and what happened (Compress also shows each file's size before and after). Password-protected PDFs are skipped and listed.
Compare, health and forensic tracing
- Compare: Put two versions of a document side by side, right in the PDF Easy window, and highlight the differences — not just text, but changed images and signatures too. A whole-document summary opens in a side panel.
- Health & privacy: A deep pre-flight check for hidden data, scanned pages with no text layer, non-embedded fonts, links, signatures, encryption and page-consistency issues, grouped by severity.
- Forensic watermark: Issue a traceable copy per recipient, with a covert tracer embedded across the page text and metadata, so a leaked copy can be traced back to whom it was issued — and a “trace a file” check reads the tracer back.
Annotate and OCR
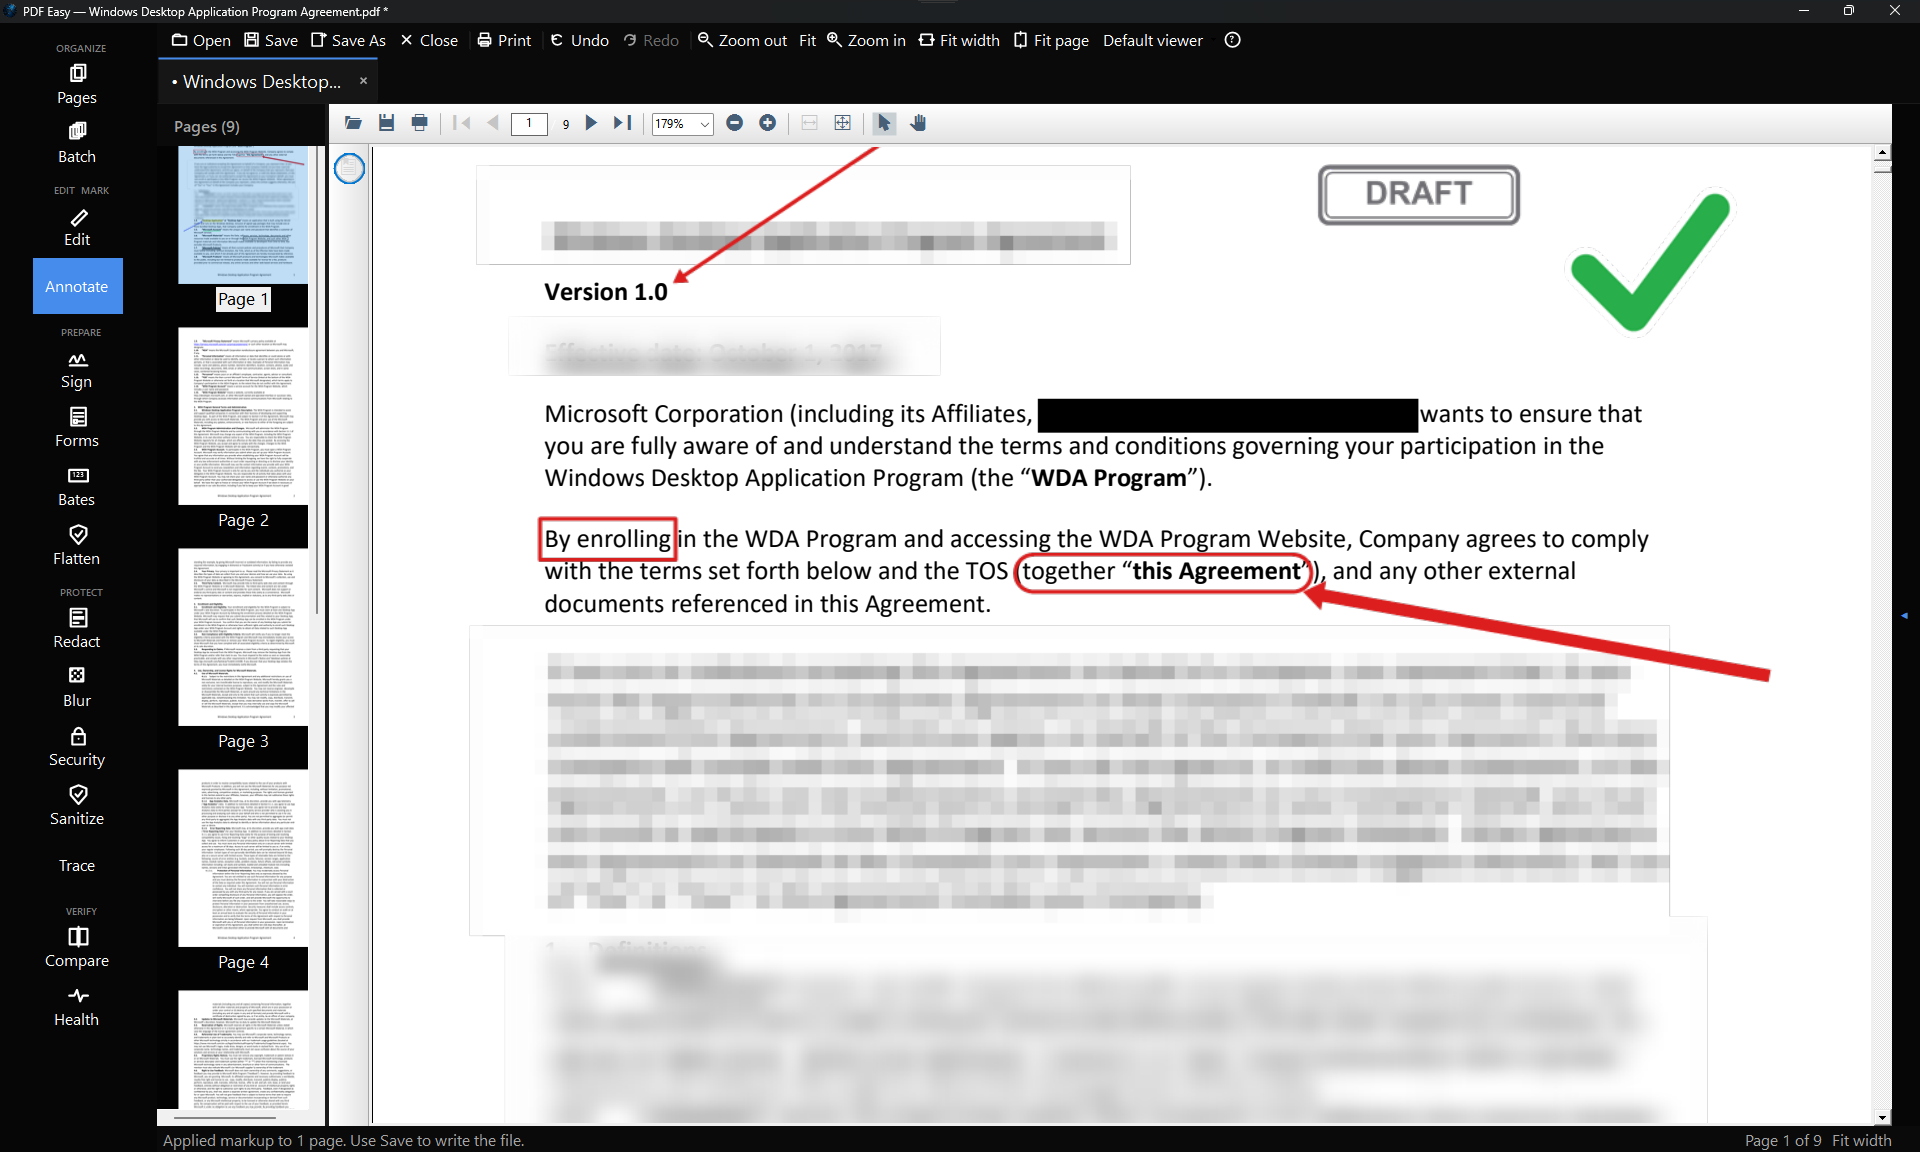
Annotate. The Annotate mode of the all-in-one editor gives you the full markup toolset right on your pages, and lays your marks over the pages as an overlay, so the page's real text stays underneath (search, redaction and OCR keep working). Scroll through the whole document as you mark it up, fit the pages to the width or to the whole page, and zoom with Ctrl + mouse-wheel. The classic markup editor is still one click away in the Annotate panel for Safe to Share and OCR text recognition.
The editor gives you the complete markup toolset: arrows in many styles (open, double-headed, block, diamond, dot, curved, barbed, chevron, arc and bar-end) and lines (straight, dashed, dotted, double, wavy and dimension); a whole family of rectangles — plain, rounded, dashed, dotted, filled, drop-shadow box, callout-style card and double-border — plus ellipses, a speech-bubble callout with a pointer tail you can drag to aim anywhere, a highlighter and a natural-feeling freehand pen for handwriting (smooth strokes that are fuller when you write slowly and finer when you write quickly, and that follow your pen's pressure on a tablet); text with its own style dialog (font, size, bold / italic / underline, left / centre / right alignment, colour, an optional background and an outline / halo that keeps it readable on any background), and auto-numbered step badges; blur, pixelate or a solid black bar to hide sensitive details, and a spotlight (rectangle or ellipse) that dims everything outside a region to draw the eye to one spot; stamps and text / image watermarks. Precision helpers make it quick — pick a colour straight off the page with the eyedropper, hold Shift while drawing for perfect horizontals, verticals, squares and circles, and each tool remembers the colour and width you last used with it.
Safe to Share — auto-redaction across the whole document. One tap reads the page with OCR and finds things you usually don't want to share — emails, phone numbers, card numbers (validated with a Luhn check so real cards aren't missed), ID and long numbers, IP addresses, and API keys or tokens. On a multi-page PDF you choose the scope first — this page, all pages, or a range like 1-20, 35, 40-50 — so a 100-page document doesn't have to be done page by page; a progress bar scans the chosen pages and you can cancel at any time. Review the findings (grouped by page, each shown masked so the list itself doesn't reveal them), tick exactly what to cover by category or item, pick a black bar, blur or pixelate, and apply. When you apply to the PDF, the covered details are redacted for real — removed from the file, not just hidden under the bar. Blur and pixelate get a verification pass that re-reads the covered areas and offers to upgrade to solid bars if anything is still legible.
Cover the whole document once. Place a watermark, a stamp ( DRAFT, CONFIDENTIAL…), a header, a disclaimer or any mark on one page, then Copy to pages puts an exact copy on all pages or a page range you choose — so you don't have to stamp a long document by hand. Watermarks fit each page automatically, and every property (image, wording, angle, opacity) comes across intact.
OCR. Make searchable runs OCR over a scanned, image-only PDF and adds an invisible text layer, so search, find & replace and the auto-redact library all work on it. Pages that already have text (a typed page, or one that was made searchable before) are left as they are, so the text is never added twice; a scanned page with just a stamp or page number typed on it is still read. To do a whole folder of scans at once, use Batch > Make searchable (OCR). It uses the suite's own recognition engine, with a professional OCR engine as a fallback.
Convert to Word, Excel or CSV
Convert turns a PDF into a document you can edit in Microsoft Word, or copies its tables into an Excel workbook or CSV files (a simple table format that any spreadsheet, accounts program or database can open). You don't need Word or Excel on your PC to make the files, and your PDF isn't changed.
 Convert a PDF to Word, step by step 1. Open the PDF and click Convert on the tool rail on the left.
2. Under Make, choose Word document (.docx).
3. Under Pages, leave All pages, choose Selected pages (the pages you picked in the thumbnails), or choose These pages: and type them, for example 1-3, 5.
Optional: tick Keep every line exactly as in the PDF when you want the Word file to look as close to the PDF as possible — for checking, comparing or printing. Every line then ends where it does in the PDF. Leave it off if you’ll rewrite a lot of the text: paragraphs then flow freely as you type, and lines still break where the PDF’s do almost everywhere.
4. Click Convert…, choose where to save the file and click Save. A bar at the bottom of the window shows each page being read; Stop stops it, and then nothing is saved.
5. When it's done, the panel says what came across (for example 3 pages, 29 paragraphs, 1 table, 1 picture). Click Open it to open the file, or Show in folder to see where it was saved.
 Example. Your club's annual report is a 3-page PDF in Documents\Club, and you want to change a few figures for next year. Open Annual Report 2026.pdf, click Convert, keep Word document and All pages, click Convert… and save it as Annual Report 2026.docx next to the PDF. In Word you get the same headings (they show in Word's Navigation pane), the bullet and numbered lists as real lists, the money table as a real Word table with its green heading row, the chart as a picture, the club's web link still clickable, and Page 1 of 3 in the footer counting by itself.
Copy the tables into Excel
1. In the Convert panel, under Make, choose Excel workbook (.xlsx) (or CSV files).
2. Leave Only the tables ticked to get just the tables, or untick it to get all the text of every page as well.
3. Click Convert… and save. Each table goes on its own sheet (tick Put every table on one sheet to keep them together); with CSV, each table is its own file, named after the PDF and the table, for example Statement - Table 1 (page 1-6).csv.
 Example. A 6-page account statement has one long table of dates, descriptions, debits, credits and balances. Converted to Excel it becomes one sheet with the heading row frozen at the top (the heading repeated on each PDF page is left out), the dates as real dates and the amounts as real numbers — (191.71) becomes minus 191.71 and still shows in brackets — so you can sort, filter and add them up straight away.
How it works and what to expect
- Word: paragraphs, headings, bullet and numbered lists, tables (merged cells, borders and shading), pictures, links, two or three text columns, headers and footers come across, in the same fonts, sizes and colours, with bold, italic, underline, highlight and superscript. Lines break where they do in the PDF. Charts, logos and other drawings come across as pictures, and text standing sideways comes across as a picture of it.
- Fonts: the file uses the PDF's own fonts. If a font isn't on the PC that opens the file, Word uses the closest one, so lines may break a little differently there.
- Justified text: a document with justified paragraphs (straight left and right edges) usually opens in Word with Compatibility Mode in the title bar. That keeps its lines breaking as in the PDF; you can edit it as normal. A PDF that was made by Word 2013 or later opens normally instead, because it was laid out the newer way.
- Excel and CSV: numbers, money, percentages and dates become real values with the same look; codes with leading zeros (postcodes, phone numbers) and long numbers such as card numbers stay as text. A table that carries on over several pages stays one table.
- Scanned pages (pictures of text) are read with OCR when Read scanned pages is ticked; the panel says how many. Check names and numbers on those pages, as OCR can misread a letter.
- Marks drawn on the PDF — arrows, circles, boxes, highlighting, a dimmed spotlight, blurred or pixelated areas — come across as one see-through picture over the page, exactly where they were, and the text underneath stays editable. Example: a contract you marked up in PDF Easy with a red circle round “Order” and two arrows converts with the circle and arrows over the same words. Text you redacted (blurred, pixelated or blacked out) stays removed: only the blurred patch comes across, not the words.
- Private details stay private: words hidden under a blur, black bar or whiteout in the PDF are left out of the new file.
- How long it takes: a few seconds for most documents (about a second a page; scanned pages take longer).
If something isn't right
- "This PDF is protected so its content can't be copied": the author doesn't allow copying, and PDF Easy respects that. Ask them for an unprotected copy.
- "The file couldn't be saved": the file is probably still open in Word or Excel. Close it there, or save under another name.
- No tables were found: Excel then gets every page's text on its own sheet instead, so nothing is lost.
- A scanned page came out empty: tick Read scanned pages (OCR) and convert again.
- A few lines break in a different place than in the PDF: convert again with Keep every line exactly as in the PDF ticked.
- A page looks different in Word: unusual layouts (text placed freely over pictures, many small text boxes) can't always become normal Word paragraphs. Convert just that page with These pages:, or use the PDF itself for that page.
To convert every PDF that arrives in a folder, use the PDF Easy - Convert to Word and PDF Easy - Tables to Excel or CSV steps in Watch and Process Automation.
Saving your work
Every tool applies its change to the working document in memory, so you can keep going and undo anything. Save writes over the original; Save As writes a new file; and if you try to close with unsaved changes, PDF Easy offers to save first. Copies produced by protect, sign, redact, PDF/A and the forensic tracer are always written as separate files, so your working document is never overwritten by mistake. Saving keeps the document's bookmarks (also bookmarks inside bookmarks) and links that jump to another page, and they still open the right page after you move pages. If the PDF you opened is digitally signed, Save asks first: any change makes its signatures show as broken, so you can save a copy under a new name instead ( Yes), save over it anyway ( No) or not save ( Cancel).
Run it automatically with Watch and Process
Five PDF Easy jobs can run by themselves on every PDF that arrives in a folder: Make searchable (read the text on scanned pages), Add a watermark, Remove private details (redact), Protect with a password and Make smaller (compress).
How to set it up:
1. Open Watch and Process Automation, type a Task Name and pick the Watch Folder with Browse… — the folder your files arrive in.
2. In File Types type *.pdf.
3. Click Add FW Tool…, choose one of the five PDF Easy steps and set its options: for Make smaller choose How small; for Add a watermark the Watermark text, Size, How strong and Colour; for Remove private details tick what to remove (email addresses, phone numbers, card numbers, ID numbers, IP addresses) and add any words or names; for Protect with a password type the password and choose whether printing and copying are allowed. Then tick Replace the original PDF or choose where to Save the result. The line What this step will do at the bottom of the window sums up your choices. Click OK.
4. Click Add Task, select the task and click Start Watching. From now on every new file is handled within a few seconds, while the Watch and Process window is open (it can be minimised).
Example: Scanned letters made safe to share: watch your scanner's folder for *.pdf; step 1 PDF Easy – Make searchable with Replace the original PDF ticked; step 2 PDF Easy – Remove private details saving In this folder Safe to Share. A scanned Renewal letter.pdf becomes searchable, and a copy with its email address and phone number blacked out appears in Safe to Share under the same name.
Good to know: Steps are chained: each PDF step works on the result of the step before it, so put Make searchable first when you redact scans — redaction can only find text the PDF contains. Redaction takes the text out of the file permanently; the original is only changed if you tick Replace the original PDF. Phone numbers are found when they are written without spaces (0491570006). PDFs that need a password to open are skipped and listed in the Activity Log. A PDF that is already searchable isn't an error: Make searchable notes "already searchable, nothing to read" and carries on with the next step. The protect password is stored encrypted for your Windows account.
Compress (make a PDF smaller):
The Compress tool (tool rail, under PREPARE) makes a PDF smaller, so it's easier to email, upload to a website that has a size limit, or store. Most of a big PDF's size is usually its pictures — photos, and scanned pages, which are pictures too — so Compress saves those again at the quality you choose and tidies the fonts and page contents. Text, links, bookmarks and form fields stay exactly as they are.
 How to compress a PDF:
1. Open the PDF and click Compress on the tool rail. The panel shows how big the document is now.
2. Under How small choose Smaller - pictures stay sharp (a good start), Smallest - pictures a little softer, or Keep pictures exactly as they are (only fonts and page contents are tidied — use it for documents where every pixel matters, such as a technical drawing).
3. Tick Also remove the title, author and other details if you don't want those details to go with the file.
4. Click Compress this document. The panel and the status bar show the size before and after, for example 5.19 MB → 1.9 MB (64% smaller).
5. Look at a page or two. Happy? Click Save (over the original) or Save As (a new file). Not happy? Click Undo and try another choice.
Example: A three-page walking-tour brochure with a large photo on every page is 5.19 MB — too big for some email services. With Smaller - pictures stay sharp it becomes 1.9 MB and the photos still look sharp on screen. Saved with Save As as Coastal Walks - Brochure (email).pdf, the original stays as it was.
How it works and what to expect: Nothing is written to your file until you save, and Undo puts everything back. If compressing can't make the file at least a little smaller (for example a PDF that is all text, which is small already, or one that was compressed before), nothing is changed and the status bar says so. To do many files at once, click Compress many files… (batch): choose the PDFs and a folder, and each result is saved there with (Smaller) added to its name; the results list shows every file's size before and after. Compress can also run by itself on every PDF that lands in a folder — see Run it automatically with Watch and Process below.
Troubleshooting:
- It's hardly any smaller. The PDF is mostly text, which takes very little room. Compress shrinks pictures most.
- The pictures look soft or blotchy. Click Undo and choose Smaller - pictures stay sharp, or Keep pictures exactly as they are.
- The PDF is digitally signed. Compressing changes the file, so its signature will show as broken. Keep the signed original and send that, or ask the sender for a smaller copy.
Page numbers, headers and footers:
The Numbers tool (tool rail, under PREPARE) puts page numbers, a title, the date, the file name or any text you type at the top (header) or bottom (footer) of every page. Each has a left, centre and right box, so you can, for example, put the file name on the left of the header and Page 3 of 12 in the middle of the footer.
 How to add page numbers:
1. Open the PDF and click Numbers on the tool rail.
2. Pick a layout under Quick start — Page 1 of 10 - bottom centre, 1, 2, 3 - bottom right, File name and date - top or Title - top centre, page numbers - bottom right — or type your own text into the Header and Footer boxes. These codes are filled in for you on each page: {page} the page number, {pages} the last page number, {date} today's date, {file} the file's name and {title} the document's title. A box you leave empty puts nothing there.
3. Under Look choose the Text size, the Colour (dark grey, black, blue or red) and the Distance from the page edge in points (72 points is 1 inch, or 2.5 cm).
4. Under Which pages set the Number on the first page that gets one, the page range ( From page, To page — 0 means the last page) and tick Leave the first page out for a cover page.
5. Click Add to this document, check a page or two, then Save.
Example: A 12-page report with a cover page. Choose Page 1 of 10 - bottom centre, tick Leave the first page out and set the first number to 1. Page 2 now shows Page 1 of 11 at the bottom and the last page Page 11 of 11; the cover stays clean. Type {file} in the header's left box and each page also shows the report's file name at the top.
How it works and what to expect: The text is drawn onto the pages in Arial and becomes part of them, so it prints and shows in every PDF reader. Pages that are turned sideways get their numbers along the edges as you see them, the right way up. {pages} is the number on the last page that gets one, so with a cover page left out and the first number 1, a 12-page file shows of 11. {date} uses your Windows date format; {title} is empty when the document has no title. Add to many files… (batch) does the same for a set of PDFs: each file starts again at your first number, {file} is each file's own name, and the results are saved with (Numbered) added to the name.
Troubleshooting:
- The numbers sit on top of existing text. Click Undo, then make the Distance from the page edge smaller (closer to the edge) or larger, or the text size smaller, and add again.
- The numbers appear twice. It was added twice: each click on Add to this document adds another set. Click Undo once.
- Nothing was added. Type something in at least one box, and check the page range includes the pages you want.
Bookmarks and links:
The Bookmarks tool (tool rail, under ORGANIZE) does two things. Bookmarks are a clickable table of contents: PDF readers show them in a panel beside the pages, and clicking one jumps to its page — handy in a long report or manual. Links make part of a page clickable: they open a web page, start an email or jump to another page of the same PDF.
 How to add bookmarks:
1. Open the PDF and click Bookmarks. Bookmarks the PDF already has are listed; click one to go to its page.
2. Go to the page the bookmark should open (click its thumbnail), then click Add. PDF Easy suggests the first line of text at the top of the page as the name; change it if you like and click OK.
3. To put a bookmark inside another one (a chapter with its sections), click the chapter's bookmark, go to the section's page and click Add under.
4. Tidy up with Rename…, Move up, Move down, Move out (takes a bookmark out of the one it's inside) and Delete. To change which page a bookmark opens, click it, go to the right page and click Use this page.
5. Click Save.
How to add a link:
1. For a web page or email, type the address in Web or email address (for example www.example.com or name@example.com) and click Add a web or email link…. For a jump to another page, set Or go to page and click Add a link to that page….
2. A window shows the page. Use Prev and Next to find the right page, drag a box over the words that should be clickable and click Place.
3. The link is listed under Links. Click Save.
 Example: A 40-page staff handbook. Add a bookmark for each chapter ( Welcome, Leave, Safety) with Add, and one for each section inside Leave with Add under. Then drag a link over the words see the leave form on page 12 that goes to www.example.com/leave-form. Anyone opening the handbook can now jump straight to Safety from the bookmarks panel and open the form with one click.
How it works and what to expect: Each change is made straight away (Undo takes it back) and kept when you save. A link is invisible: the words look exactly the same, the pointer just changes over them in a PDF reader. A web address without https:// gets it added, and an email address becomes an email link. Removing a link ( Remove the selected link) leaves the words on the page; they just aren't clickable any more. Bookmarks and links that jump to other pages are kept when you save, and still open the right page after you move pages. When you delete a page, the bookmarks that opened it go too. If you move pages so that a section ends up away from its chapter, its bookmark can move to the top of the list — check the bookmarks after big page moves and use Add under or Move out to put it back. A bookmark listed with (no page) came with the PDF and opens no page; click it, go to the right page and click Use this page.
Troubleshooting:
- I can't see the bookmarks in my PDF reader. Open the reader's bookmarks (or outline) panel — it is usually a ribbon-shaped button at the side.
- Add under says to click a bookmark first. Click the bookmark the new one should go inside, then click Add under.
- The link opens the wrong page. Remove it and add it again with the right page number under Or go to page.
Check signatures:
A digitally signed PDF carries proof of who signed it and that nothing has changed since. Check signatures (in Fill & Sign) reads that proof and tells you, in plain words, whether you can rely on it. When you open a signed PDF, the status bar says so.
 How to check a signed PDF:
1. Open the signed PDF and click Sign on the tool rail ( Fill & Sign).
2. Scroll the panel down to Check signatures and click Check the signatures in this PDF.
3. Read the results that open over the page. For each signature you see who signed (and their email address when the certificate has one), when, on which page, the reason and place they gave, and three checks:
[ok] Nothing in the document has changed since it was signed — or [!!] when it was changed afterwards or the signature is damaged;
[ok] The certificate was issued by …, which Windows trusts — or [??] when Windows doesn't recognise who issued it;
[ok] The certificate was in date when it was used — or [!!] when it had expired.
The Result line sums it up: VALID, Unchanged since signing, but who signed can't be confirmed, or NOT VALID. Copy copies the results, Close goes back to the page.
Example: A supplier emails Service Agreement (signed).pdf. The check shows Signed by Jordan Avery <jordan.avery@fabrikam.test>, [ok] Nothing in the document has changed since it was signed, and [??] Windows doesn't recognise who issued the certificate — Jordan made the certificate themselves. The agreement hasn't been changed since it was signed, but the signature alone doesn't prove it was really Jordan, so a quick phone call to Jordan confirms it.
How it works and what to expect: The check reads the file as it is saved on your PC, so changes you haven't saved aren't part of it. Whether Windows trusts the certificate is worked out on your PC, without going online, so a certificate that was cancelled after it was issued isn't detected. A PDF signed by two people shows both signatures, and both stay valid when the second person signed after the first. An empty signature box (a place to sign that nobody has signed yet) is listed as not signed yet. A picture of a handwritten signature isn't a digital signature, so a PDF with only that shows This PDF has no digital signatures. Saving changes over a signed PDF breaks its signatures, so Save offers to save a copy under a new name instead.
Troubleshooting:
- "Unchanged since signing, but who signed can't be confirmed". The certificate was made by the signer, or by a company Windows doesn't know. The document is unchanged; check with the person another way (phone, or an email address you already have).
- "NOT VALID" on a PDF you edited. Saving any change over a signed PDF breaks its signatures. Ask the sender for the original file again.
- "Signatures are checked in the saved file - save the PDF first". The document has never been saved (for example a new PDF made by merging). Signatures can only be checked in a saved file.
Many scans at once (Batch OCR):
To make a whole folder of scanned PDFs searchable, click Batch, choose Make searchable (OCR) under Operation and click Choose files & run…. Pick the PDFs (Ctrl+A in the file window selects them all), then the folder for the results. Each file is read page by page — a few seconds a page — and saved as a new file with (Searchable) added to its name; your scans stay as they were. The results list says how many words were found on how many pages of each file, and which pages already had text and were left as they were.

What You Can Do With This Program
Potential Uses for the PDF Easy Tool:
- Build the Document You Need: Merge several PDFs, drop the pages you don't want, reorder the rest and split the result — without a subscription.
- Redact Properly: Permanently remove names, account numbers and other private details — stripped from the file, not just covered — and let the pattern library find them for you.
- Fix a Typo in a PDF: Edit text on the page and use find & replace to correct something across the document.
- Sign and Send: Sign on screen or with a certificate, fill in a form and flatten it, and send a finished file.
- Flatten and Lock: Bake forms, signatures and annotations into the page so they can't be changed — or flatten a heavy PDF to a lighter, cleaner file.
- Lock It Down: Encrypt with AES-256 and set what recipients may do, or scrub the hidden metadata before a file leaves the building.
- Number for Discovery: Bates-number a set of documents with a consistent prefix and running count.
- Process a Whole Folder: Batch a watermark, a metadata scrub or encryption across many files at once.
- Spot the Differences: Compare two versions of a contract or report and see exactly what changed.
- Trace a Leak: Issue a traceable copy to each recipient, then identify the source if one gets out.
- Make a Scan Searchable: OCR an image-only PDF so you can search it, redact by pattern, and copy its text — or a whole folder of scans at once with Batch.
- Email a Big File: Compress a PDF full of photos or scans until it fits under an email or upload size limit.
- Number the Pages: Add Page 1 of 12, the date or the file name to every page, leaving the cover page clean.
- Make a Long Document Easy to Use: Add bookmarks for each chapter and links to web pages, emails and other pages.
- Check a Signed Contract: See who signed a PDF and whether anything changed after it was signed.
- Mark Up a Page: Annotate a PDF with arrows, notes and stamps to point something out before you send it.
- Archive for the Long Term: Convert to PDF/A so a document stays readable and self-contained years from now.
|